Your First MQL5 Expert Advisor: A Ready-Made Robot You Can Copy and Launch Today

Plenty of traders never automate a strategy because building a trading robot looks like it needs a programming background. The entry barrier is lower than that. Your first MQL5 expert advisor is about a hundred lines of code, and this article hands you all of them, together with the steps that turn them into a robot running on a MetaTrader 5 chart.
The worked example uses a classic trend strategy: a crossover of two exponential moving averages, EMA 9 and EMA 21. The logic is simple enough to stay out of the way, which leaves room to understand the structure every expert advisor shares, from the file that MQL Wizard generates to the compiled robot placing its first test trade.
In Brief
- The robot trades one rule: EMA 9 crossing EMA 21 upwards opens a buy, crossing downwards opens a sell.
- Everything happens inside MetaEditor 5, which ships with MetaTrader 5, so there is no extra software to install.
- The example uses a fixed 0.10 lot with a stop-loss and a take-profit attached to every position, and it evaluates signals once per closed candle.
- A ready template gives you code you can read and verify. An AI chat is the better tool once you want to extend that code.
- Run it in the Strategy Tester first, then on a demo account, and check the Experts log before any live account is involved.
The Working Environment: How to Open MetaEditor 5
Building a trading robot takes no third-party software. MetaTrader 5 already includes MetaEditor 5, the development environment for writing and editing MQL5 programs.
MetaEditor combines the code editor, the compiler, the debugger, the MQL5 reference documentation and the built-in MQL Wizard, which generates ready-made templates for expert advisors, indicators and scripts.
Two ways to open it from the trading terminal:
- Press F4.
- Select Tools → MetaQuotes Language Editor from the top menu.
Creating the Robot File with the MQL Wizard
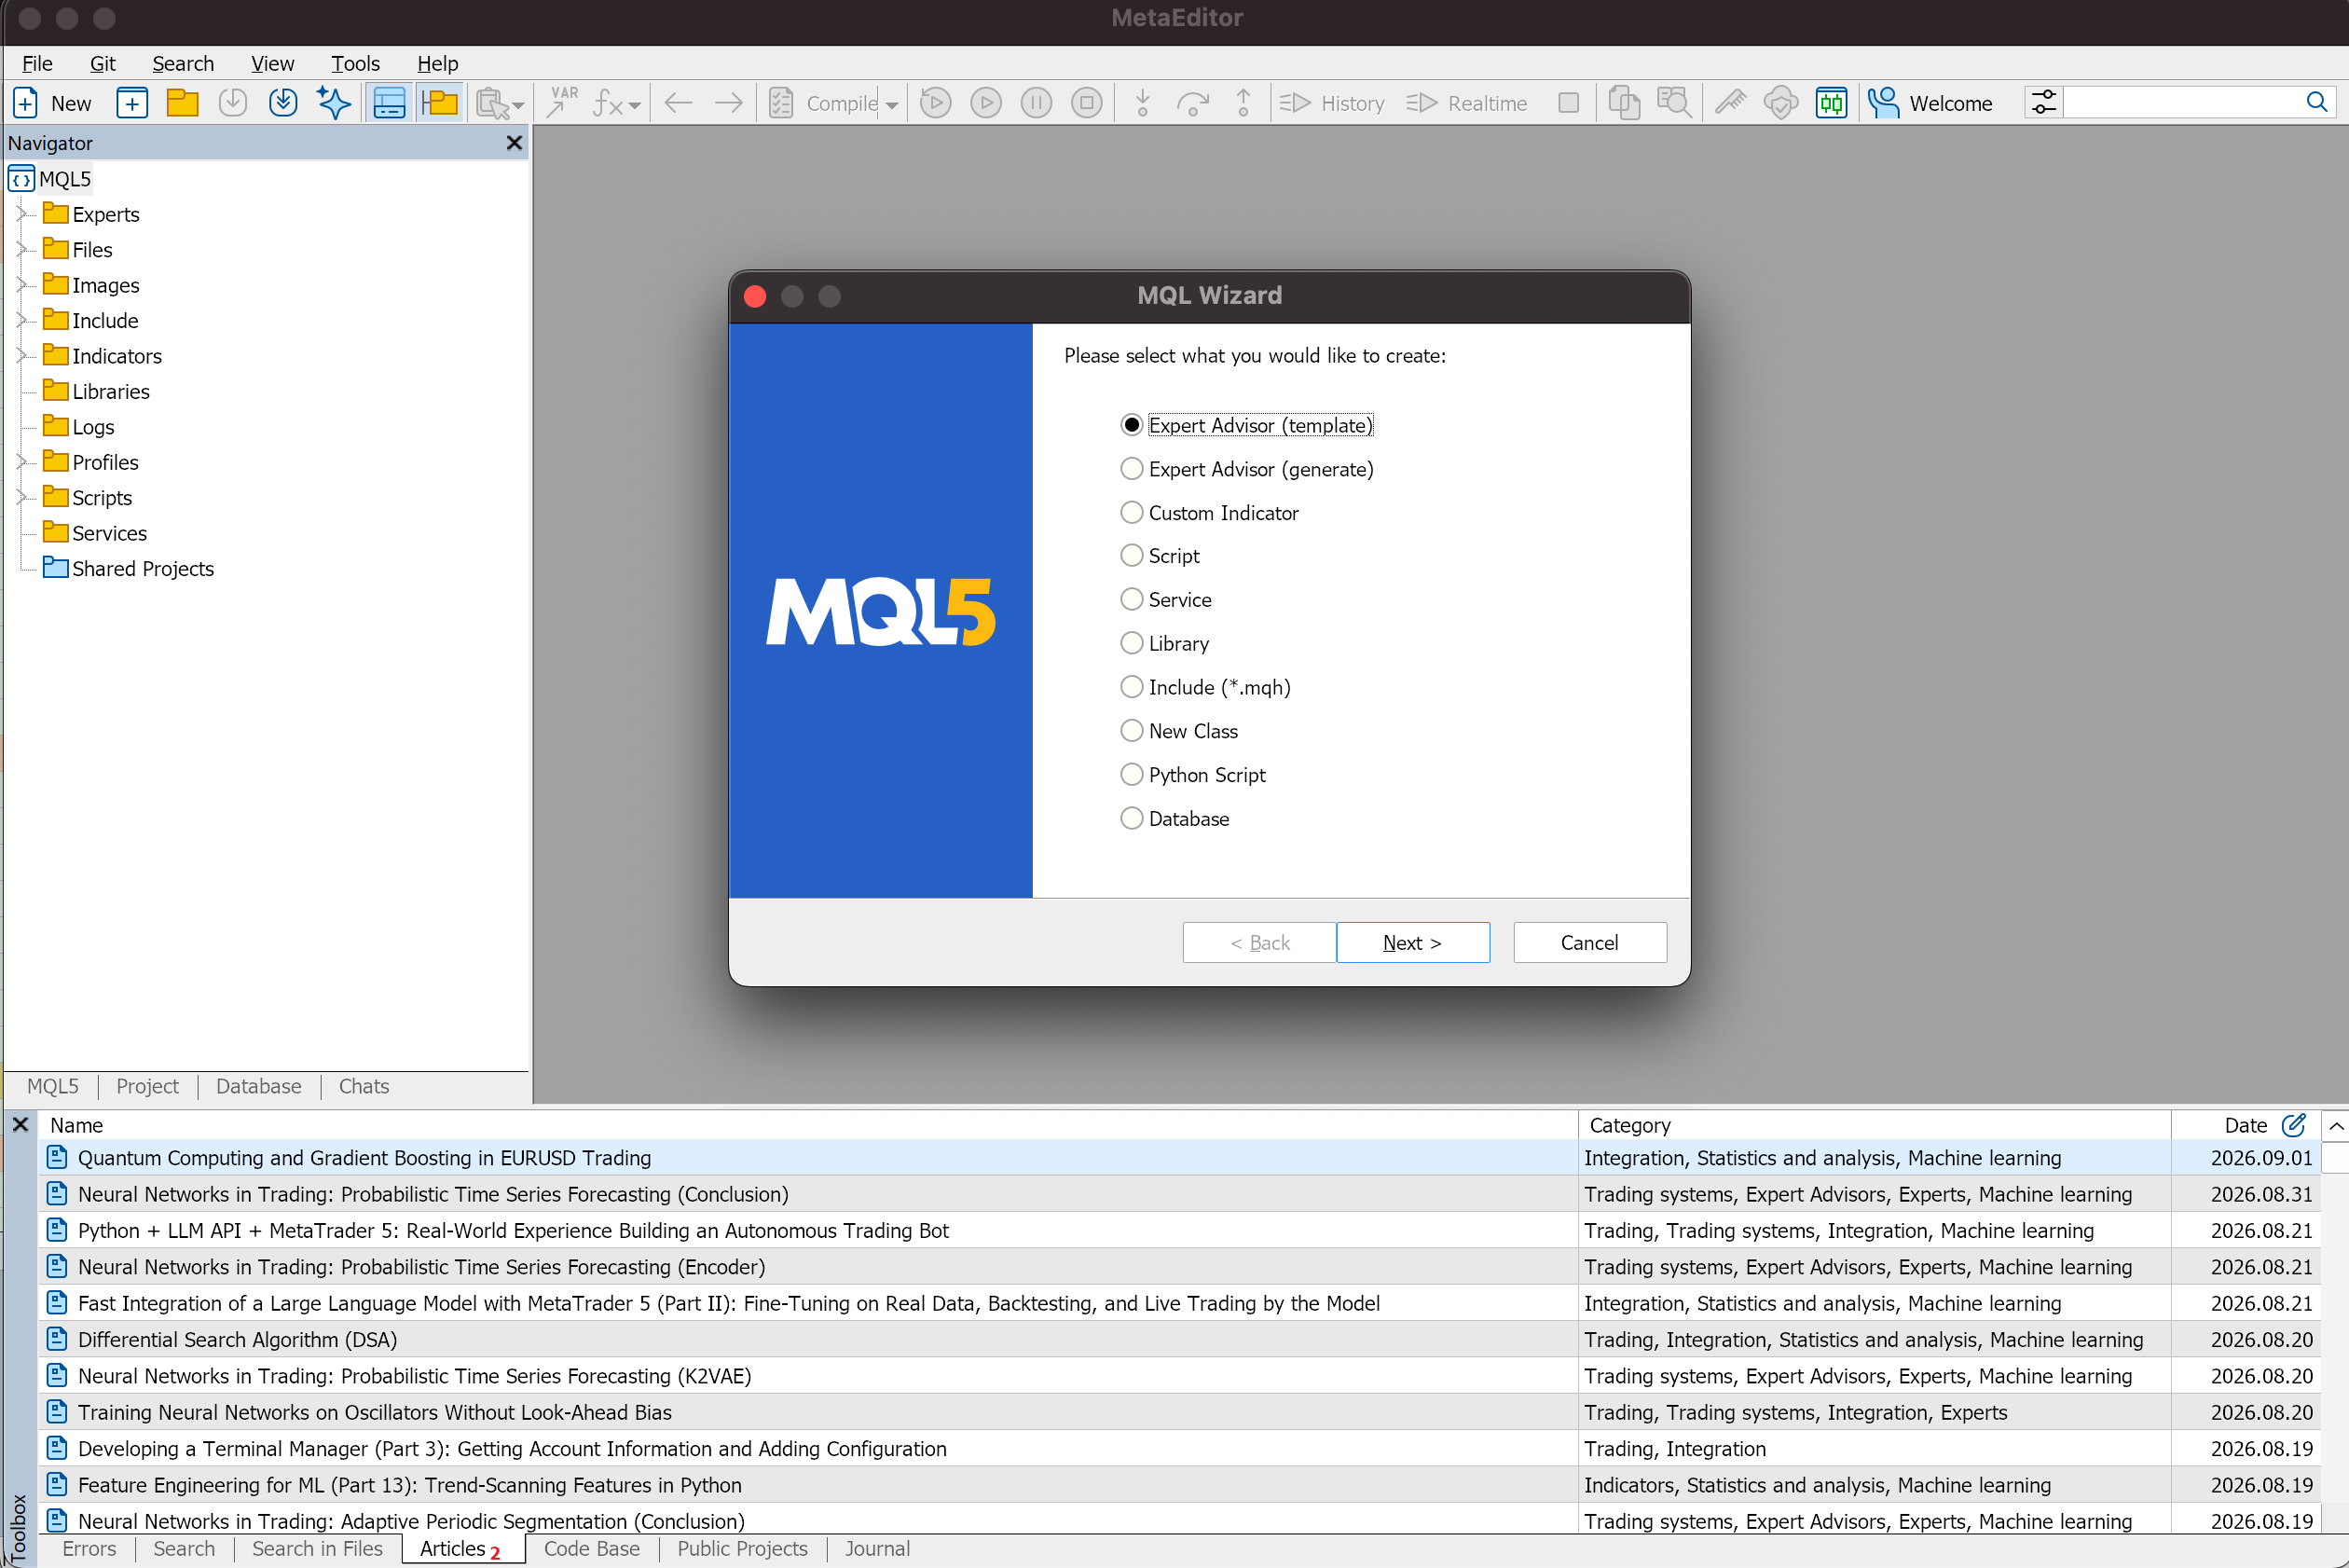
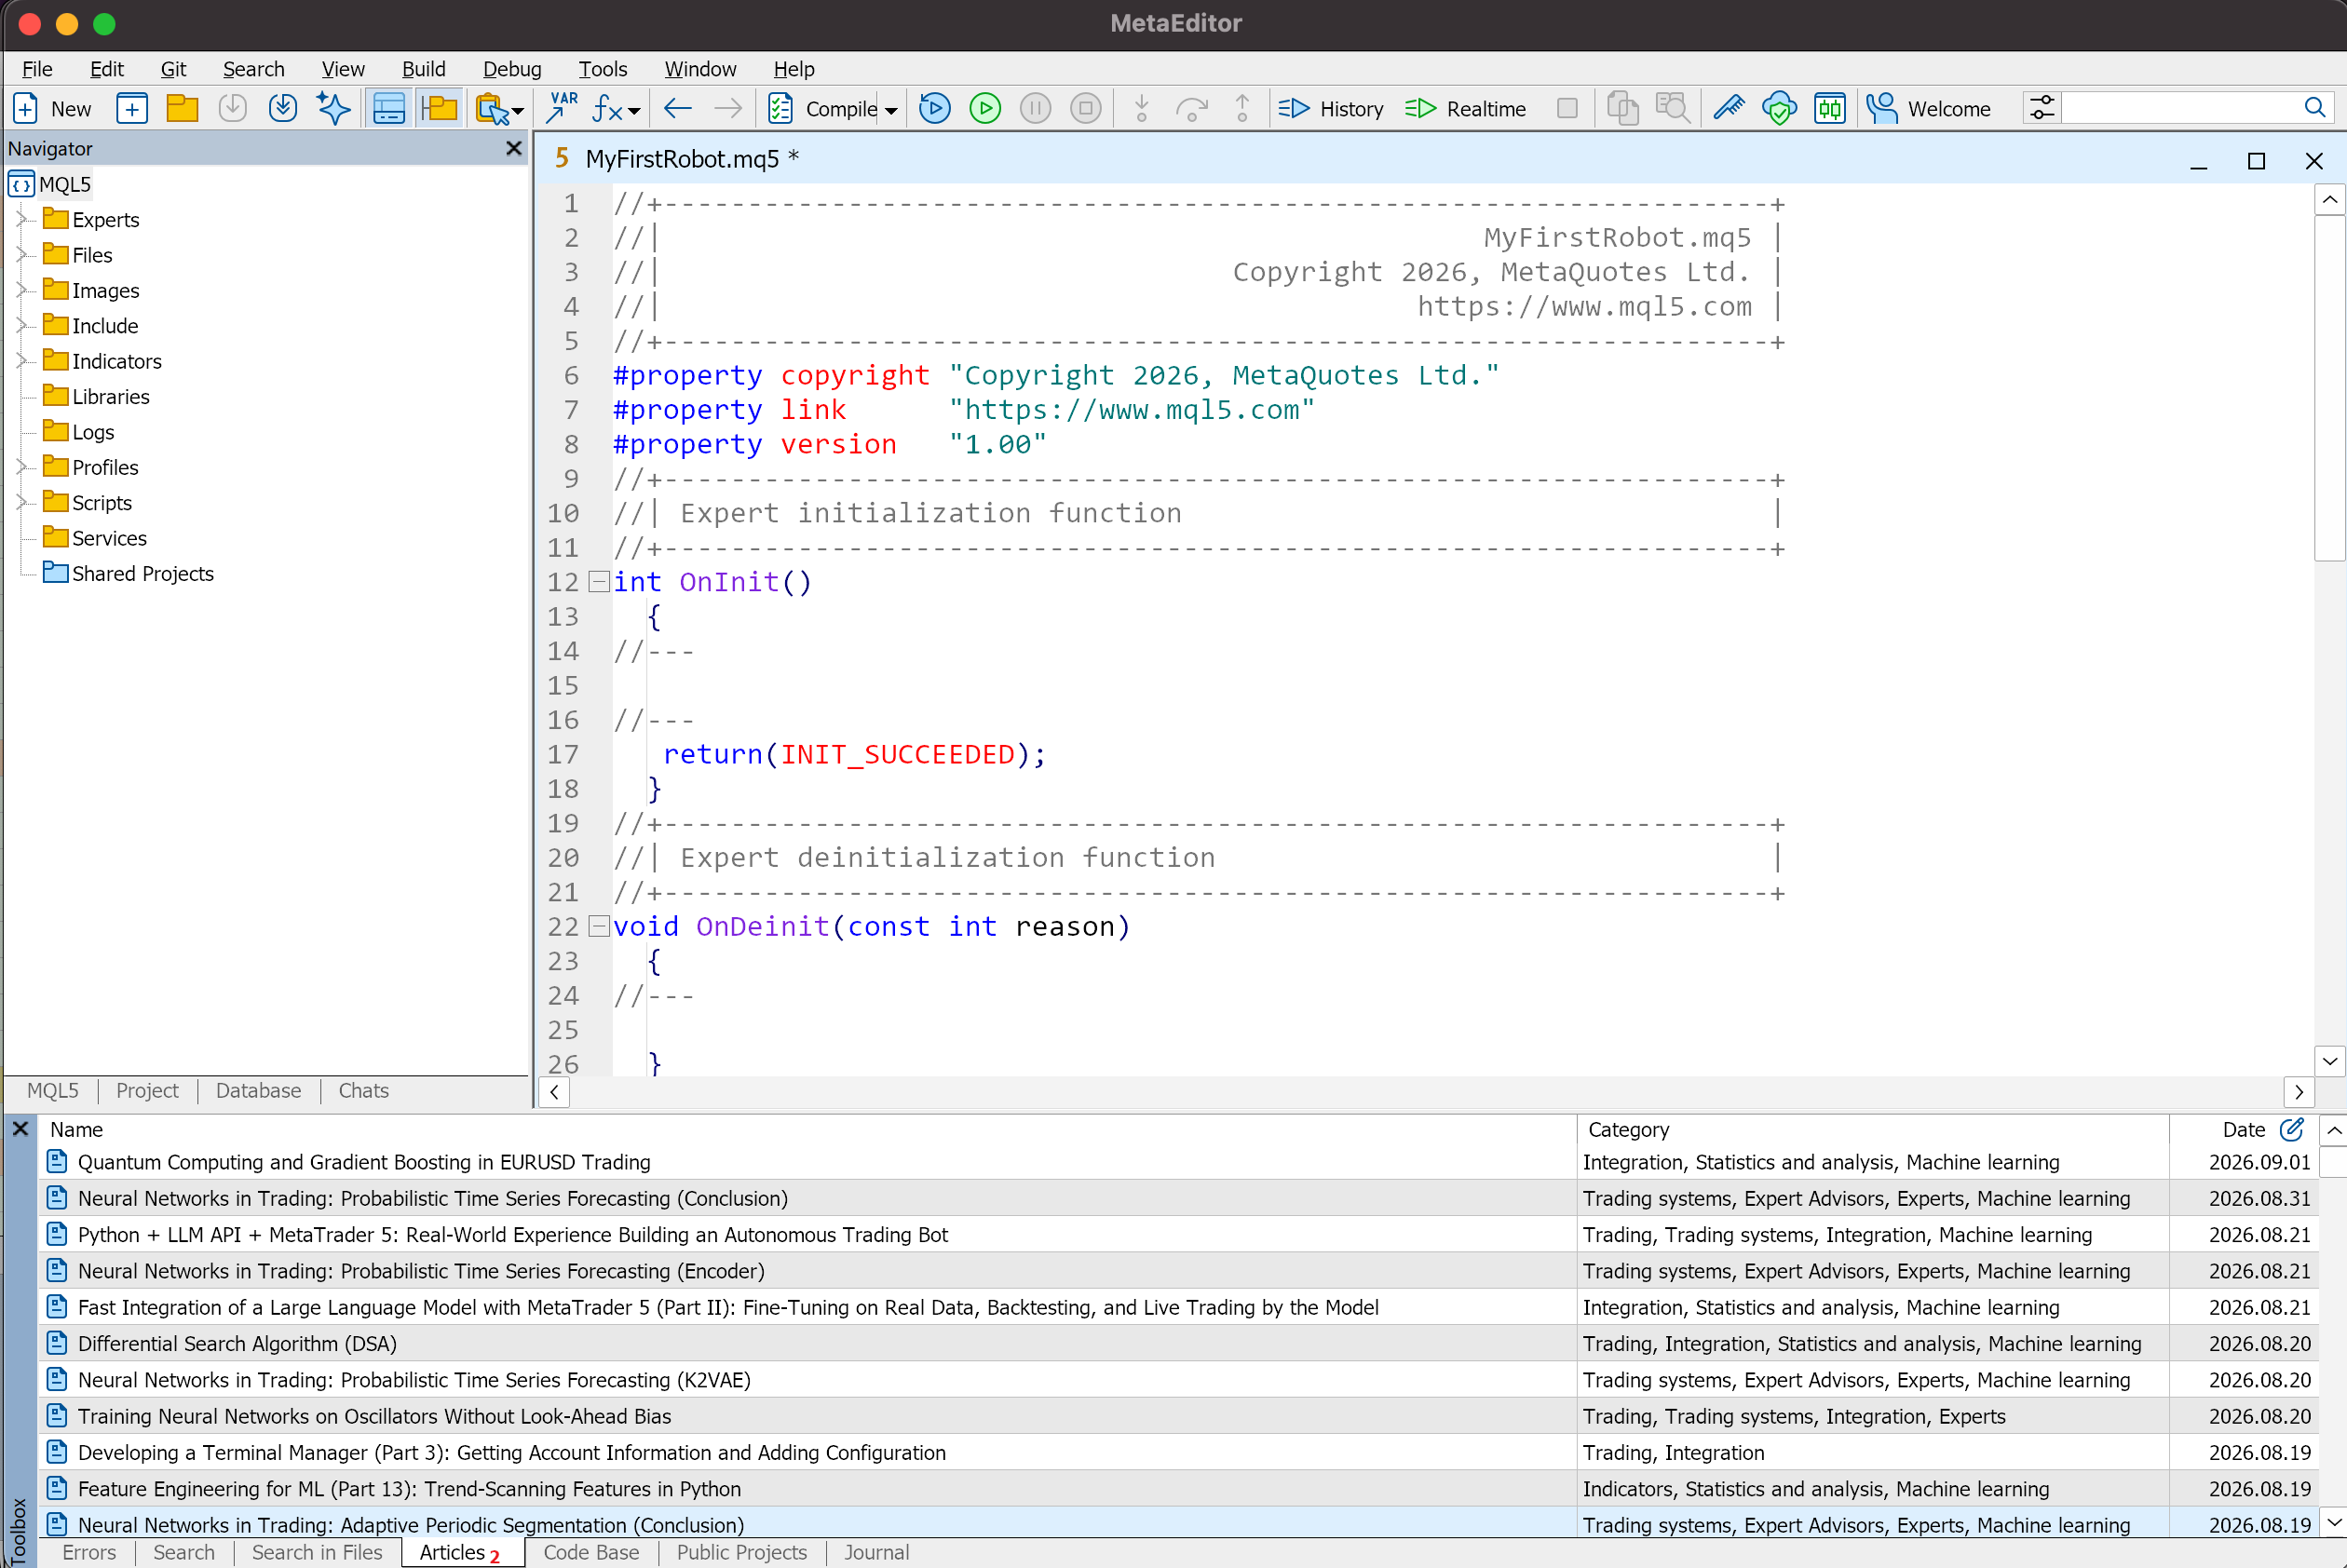
With MetaEditor open, the MQL Wizard builds the skeleton of the program for you. Start with File → New. The wizard offers a choice of program types, and the one for this example is Expert Advisor (template).
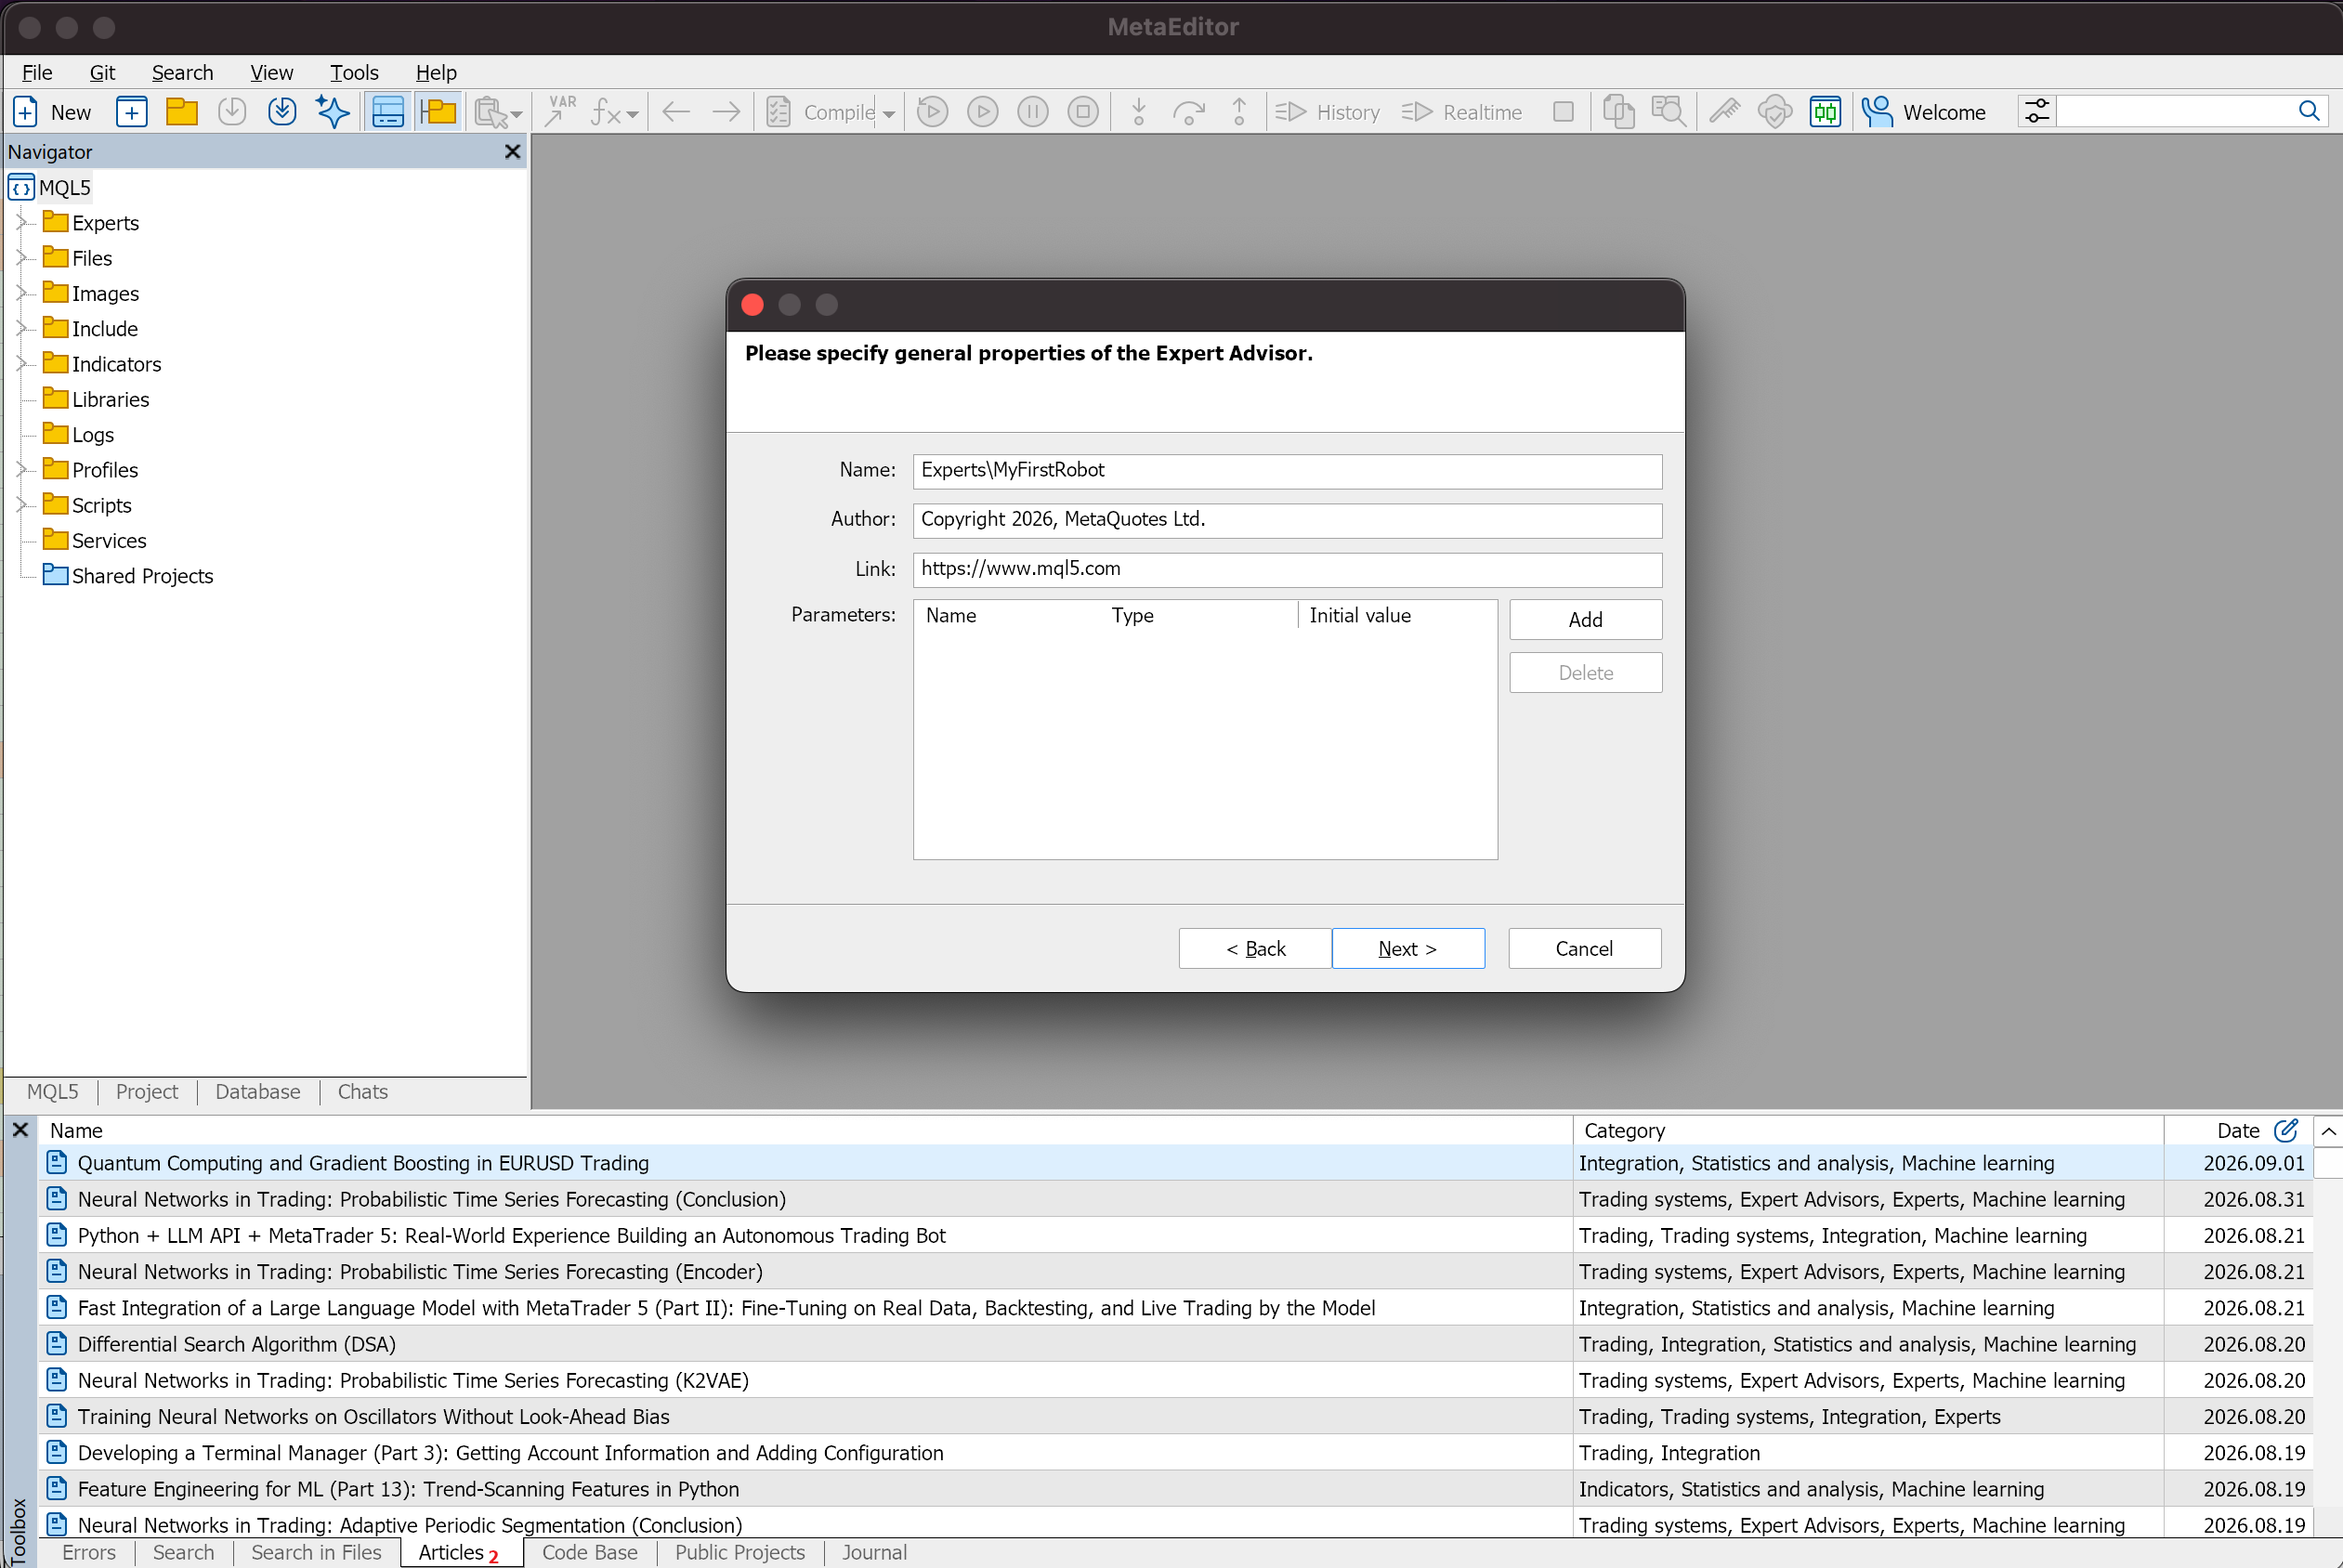
Next comes the program description. The Name field takes the path and the file name, for example Experts\MyFirstRobot. Author and Link are optional and can stay empty.
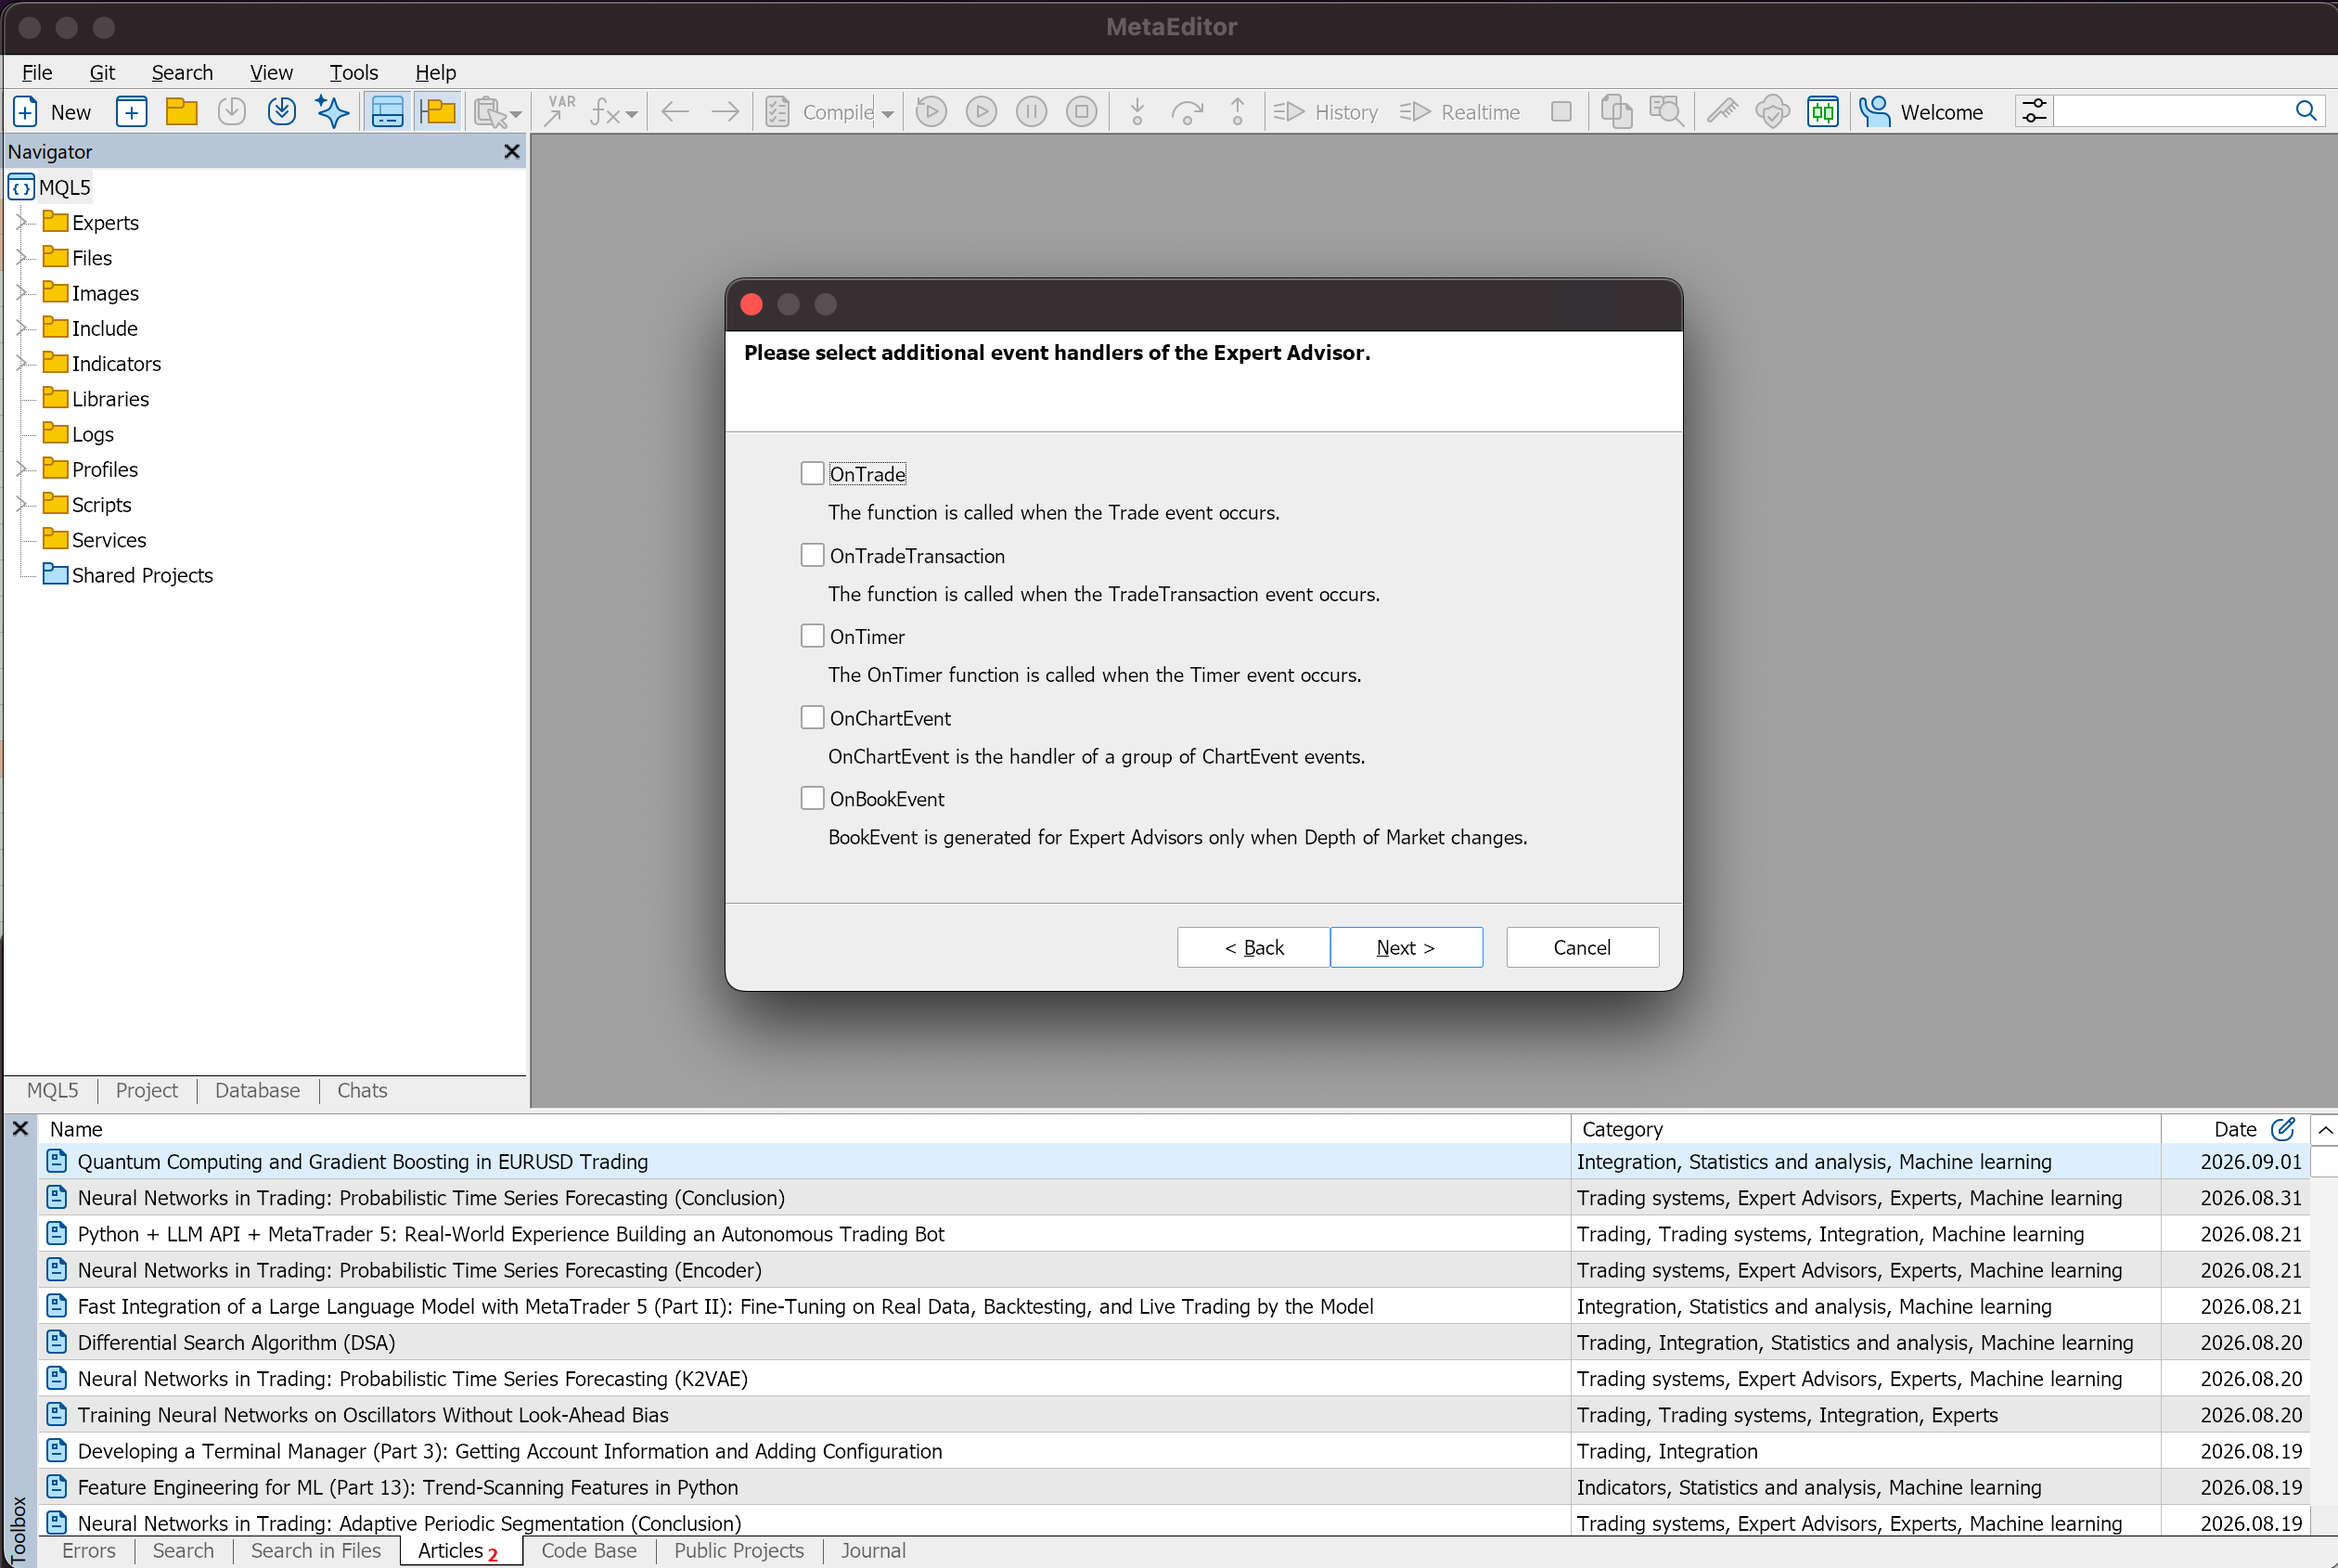
The wizard then offers extra event handlers, including OnTimer and OnTrade. This robot uses neither, so the defaults stay as they are.
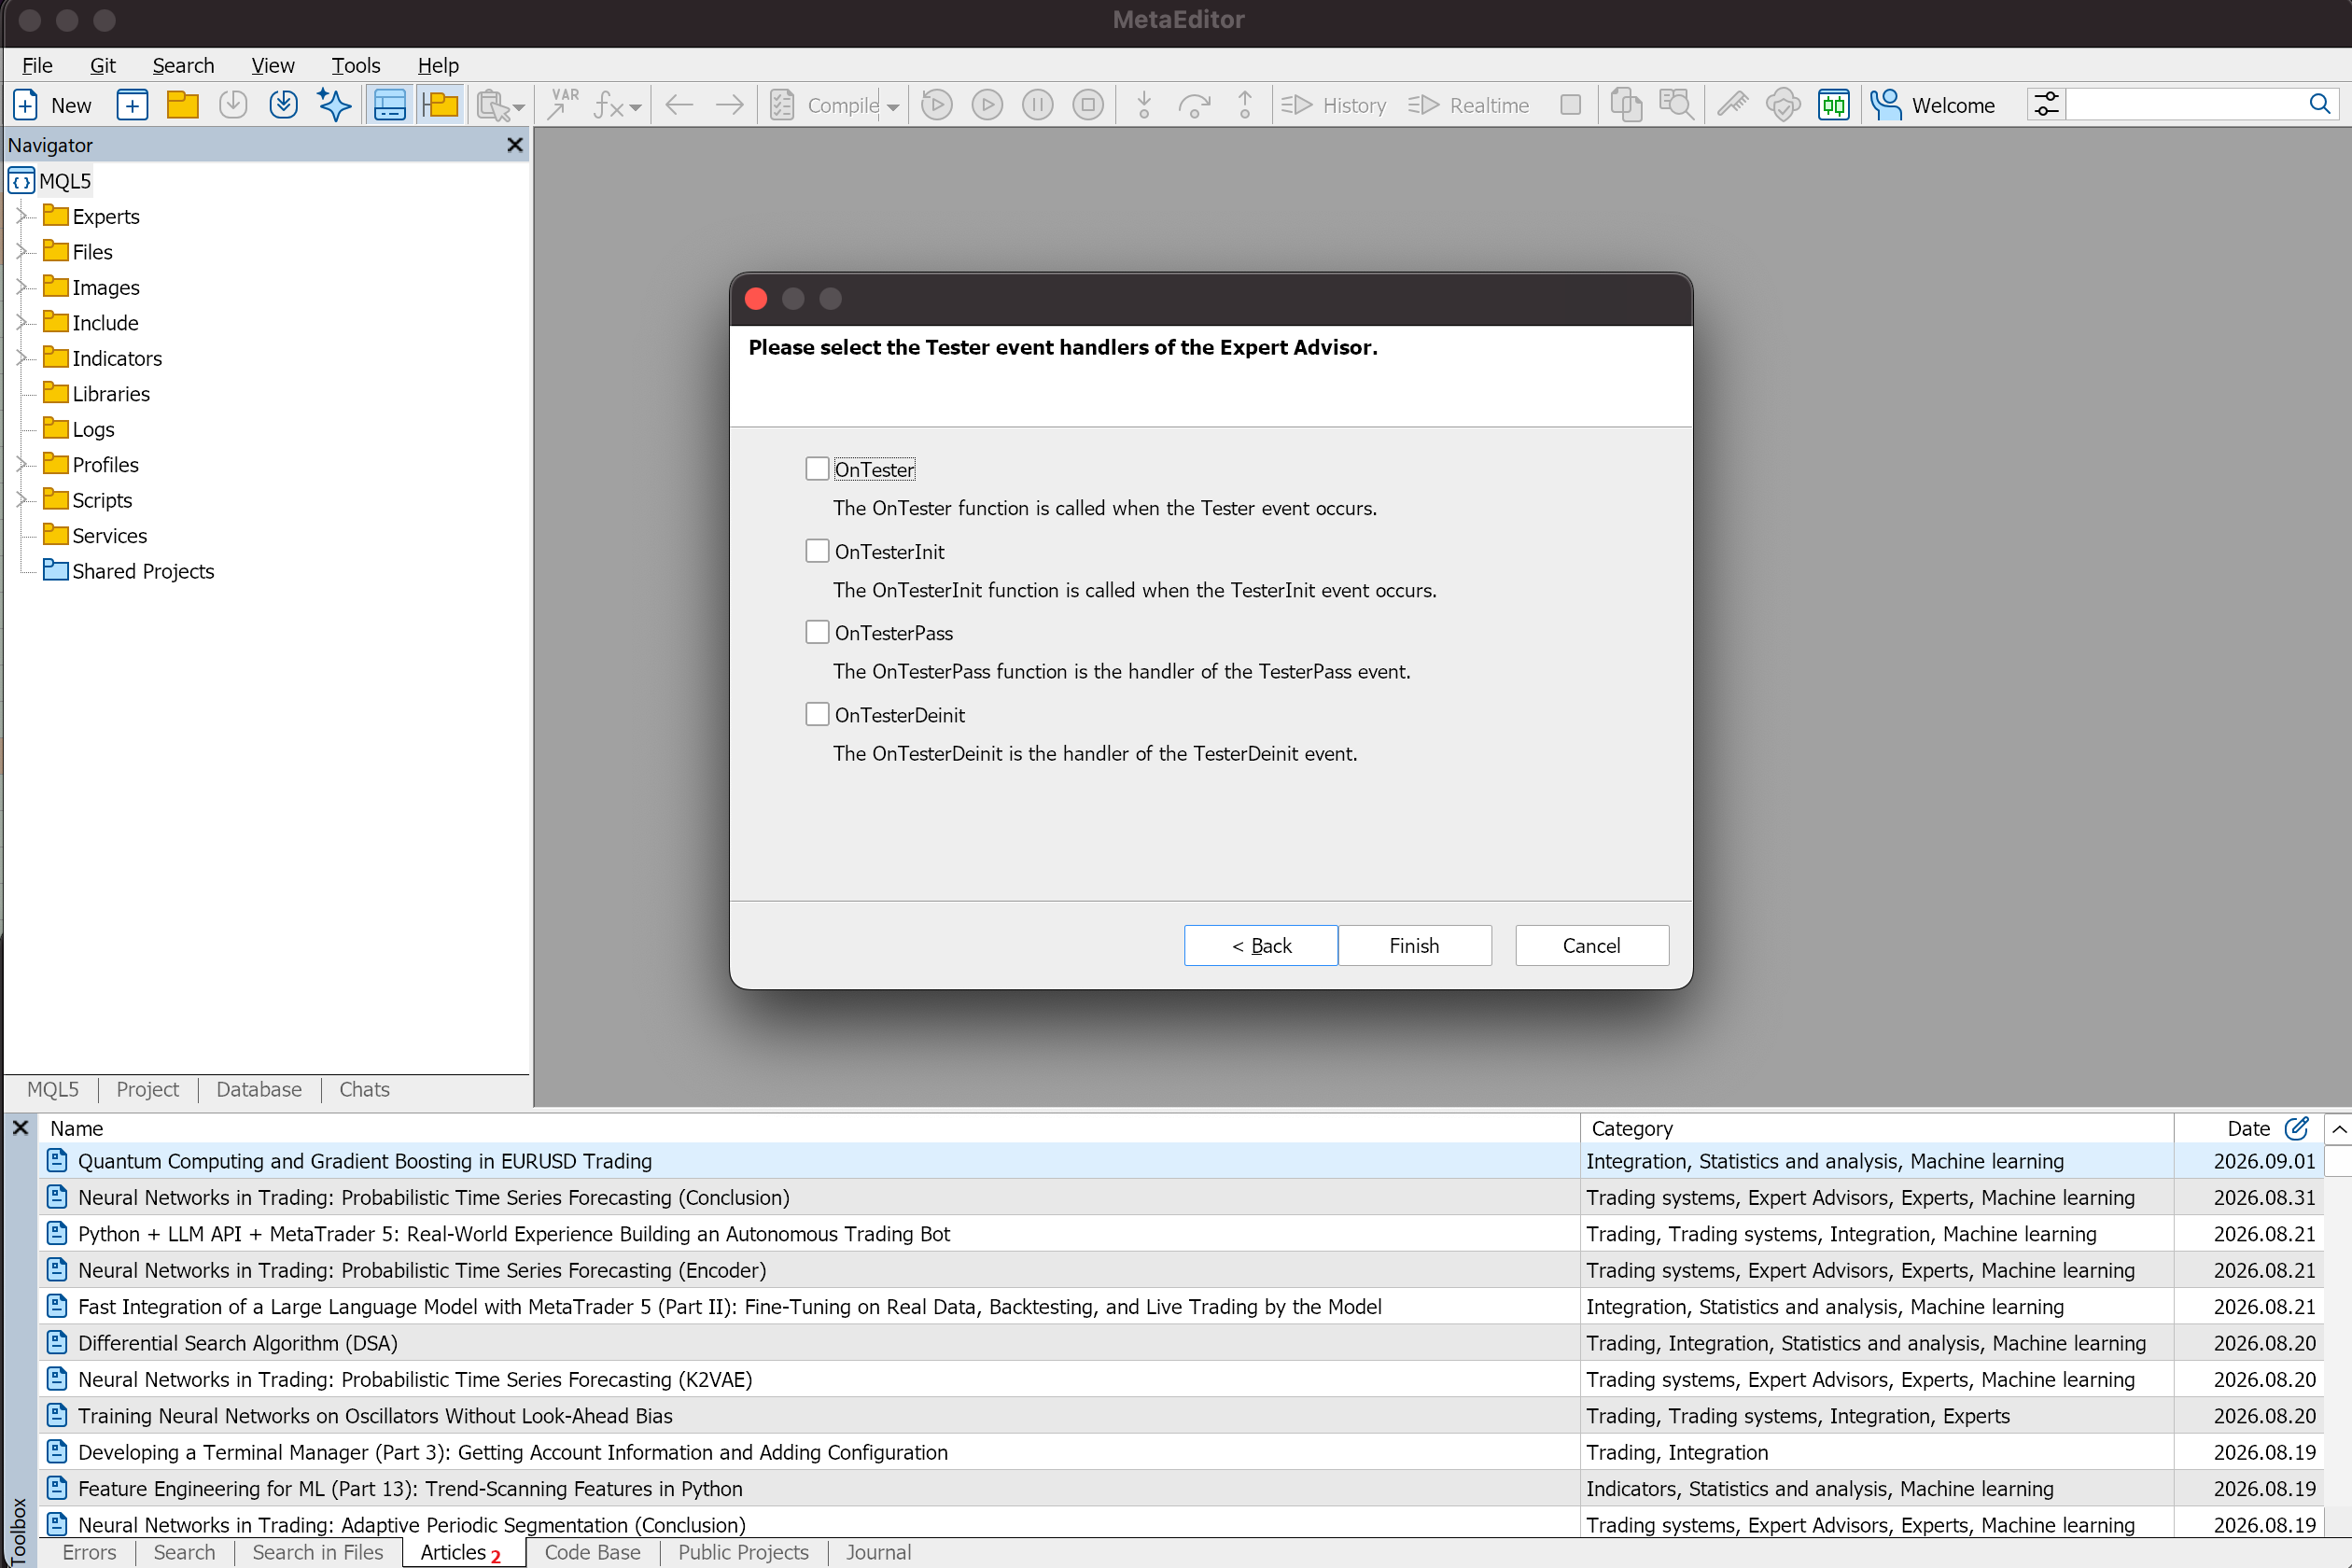
The last screen covers the OnTester testing events. They are also unused here, so the parameters stay untouched and the wizard finishes.
MetaEditor now holds a new .mq5 file containing the basic structure of an expert advisor. That skeleton is the starting point for the trading logic.
The Ready-Made MQL5 Robot Code
Below is the complete expert advisor built on the EMA 9 and EMA 21 crossover. Select everything in the generated template, delete it, and paste this in its place, so the .mq5 file holds only the robot code. After that it is ready to compile.
MyFirstRobot.mq5
//+------------------------------------------------------------------+
//|                                                 MyFirstRobot.mq5 |
//|                          EMA 9 / EMA 21 crossover Expert Advisor |
//+------------------------------------------------------------------+
#property copyright "MyFirstRobot"
#property version   "1.00"
#property description "Simple EMA 9/21 crossover Expert Advisor"

#include <Trade/Trade.mqh>
CTrade trade;

//--- Trading parameters
input double InpLotSize    = 0.10;    // Lot size
input int    InpFastEMA    = 9;       // Fast EMA period
input int    InpSlowEMA    = 21;      // Slow EMA period
input int    InpStopLoss   = 200;     // Stop Loss in points
input int    InpTakeProfit = 400;     // Take Profit in points
input ulong  InpMagic      = 123456;  // Magic number

//--- Indicator handles
int fastEMAHandle;
int slowEMAHandle;

//--- Opening time of the last processed bar
datetime lastBarTime = 0;

//+------------------------------------------------------------------+
//| Expert initialization function                                   |
//+------------------------------------------------------------------+
int OnInit()
{
   //--- Create the Fast EMA indicator handle
   fastEMAHandle = iMA(_Symbol, _Period, InpFastEMA, 0, MODE_EMA, PRICE_CLOSE);

   //--- Create the Slow EMA indicator handle
   slowEMAHandle = iMA(_Symbol, _Period, InpSlowEMA, 0, MODE_EMA, PRICE_CLOSE);

   //--- Stop the robot if either handle failed
   if(fastEMAHandle == INVALID_HANDLE || slowEMAHandle == INVALID_HANDLE)
   {
      Print("Failed to create EMA indicators");
      return(INIT_FAILED);
   }

   //--- Tag every order, so the robot only ever manages its own positions
   trade.SetExpertMagicNumber(InpMagic);

   Print("MyFirstRobot started successfully");
   return(INIT_SUCCEEDED);
}

//+------------------------------------------------------------------+
//| Expert tick function                                             |
//+------------------------------------------------------------------+
void OnTick()
{
   //--- Opening time of the current bar
   datetime currentBarTime = iTime(_Symbol, _Period, 0);

   //--- Work once per bar, on the first tick after a new bar opens
   if(currentBarTime == lastBarTime)
      return;
   lastBarTime = currentBarTime;

   //--- Dynamic arrays: the timeseries flag needs them
   double fastEMA[];
   double slowEMA[];

   //--- Index 0 is the forming bar, 1 the last closed bar, 2 the one before it
   ArraySetAsSeries(fastEMA, true);
   ArraySetAsSeries(slowEMA, true);

   //--- Copy the last three EMA values of each average
   if(CopyBuffer(fastEMAHandle, 0, 0, 3, fastEMA) < 3)
      return;
   if(CopyBuffer(slowEMAHandle, 0, 0, 3, slowEMA) < 3)
      return;

   //--- Both checks read closed bars only, never the forming bar
   bool buySignal  = fastEMA[2] <= slowEMA[2] && fastEMA[1] > slowEMA[1];
   bool sellSignal = fastEMA[2] >= slowEMA[2] && fastEMA[1] < slowEMA[1];

   //+--------------------------------------------------------------+
   //| Buy signal                                                    |
   //+--------------------------------------------------------------+
   if(buySignal)
   {
      //--- Look only at a position this robot opened itself
      if(PositionSelect(_Symbol) &&
         PositionGetInteger(POSITION_MAGIC) == (long)InpMagic)
      {
         long positionType = PositionGetInteger(POSITION_TYPE);

         //--- A buy is already running, nothing to do
         if(positionType == POSITION_TYPE_BUY)
            return;

         //--- Close the opposite position before reversing
         if(positionType == POSITION_TYPE_SELL)
            trade.PositionClose(_Symbol);
      }

      double ask = SymbolInfoDouble(_Symbol, SYMBOL_ASK);
      double sl  = NormalizeDouble(ask - InpStopLoss   * _Point, _Digits);
      double tp  = NormalizeDouble(ask + InpTakeProfit * _Point, _Digits);

      trade.Buy(InpLotSize, _Symbol, 0, sl, tp, "EMA 9/21 Buy");
   }

   //+--------------------------------------------------------------+
   //| Sell signal                                                   |
   //+--------------------------------------------------------------+
   if(sellSignal)
   {
      if(PositionSelect(_Symbol) &&
         PositionGetInteger(POSITION_MAGIC) == (long)InpMagic)
      {
         long positionType = PositionGetInteger(POSITION_TYPE);

         if(positionType == POSITION_TYPE_SELL)
            return;

         if(positionType == POSITION_TYPE_BUY)
            trade.PositionClose(_Symbol);
      }

      double bid = SymbolInfoDouble(_Symbol, SYMBOL_BID);
      double sl  = NormalizeDouble(bid + InpStopLoss   * _Point, _Digits);
      double tp  = NormalizeDouble(bid - InpTakeProfit * _Point, _Digits);

      trade.Sell(InpLotSize, _Symbol, 0, sl, tp, "EMA 9/21 Sell");
   }
}

//+------------------------------------------------------------------+
//| Expert deinitialization function                                 |
//+------------------------------------------------------------------+
void OnDeinit(const int reason)
{
   //--- Release the indicator handles
   if(fastEMAHandle != INVALID_HANDLE)
      IndicatorRelease(fastEMAHandle);
   if(slowEMAHandle != INVALID_HANDLE)
      IndicatorRelease(slowEMAHandle);
}
//+------------------------------------------------------------------+
Test This Robot on a Free Demo Account
Full MetaTrader 5 access and real market conditions, with none of your own funds at stake.
Code Anatomy: What Each Block Does
The robot splits into five functional parts, each responsible for one stage of its work, from reading its settings to sending an order. Here is the map, followed by the detail on the parts worth understanding before you run it.
| Block | What it does |
|---|---|
| input parameters | Settings you can change from the robot's dialog in MetaTrader 5, with no edit to the source: EMA periods, lot size, stop-loss, take-profit and the magic number. |
| OnInit() | Runs once when the robot starts. Creates the two EMA handles and refuses to start if either one fails. |
| OnTick(), new bar filter | Runs on every incoming tick, then exits immediately unless a new bar has opened, so the strategy is evaluated once per candle. |
| CopyBuffer() and the crossover test | Reads the last three values of each EMA and compares the two closed bars to decide whether a crossover happened. |
| CTrade, trade execution | Sends the order, attaches the stop-loss and take-profit, and closes an opposite position first when the signal reverses. |
| OnDeinit() | Runs once when the robot is removed from the chart and releases both indicator handles. |
Input Parameters
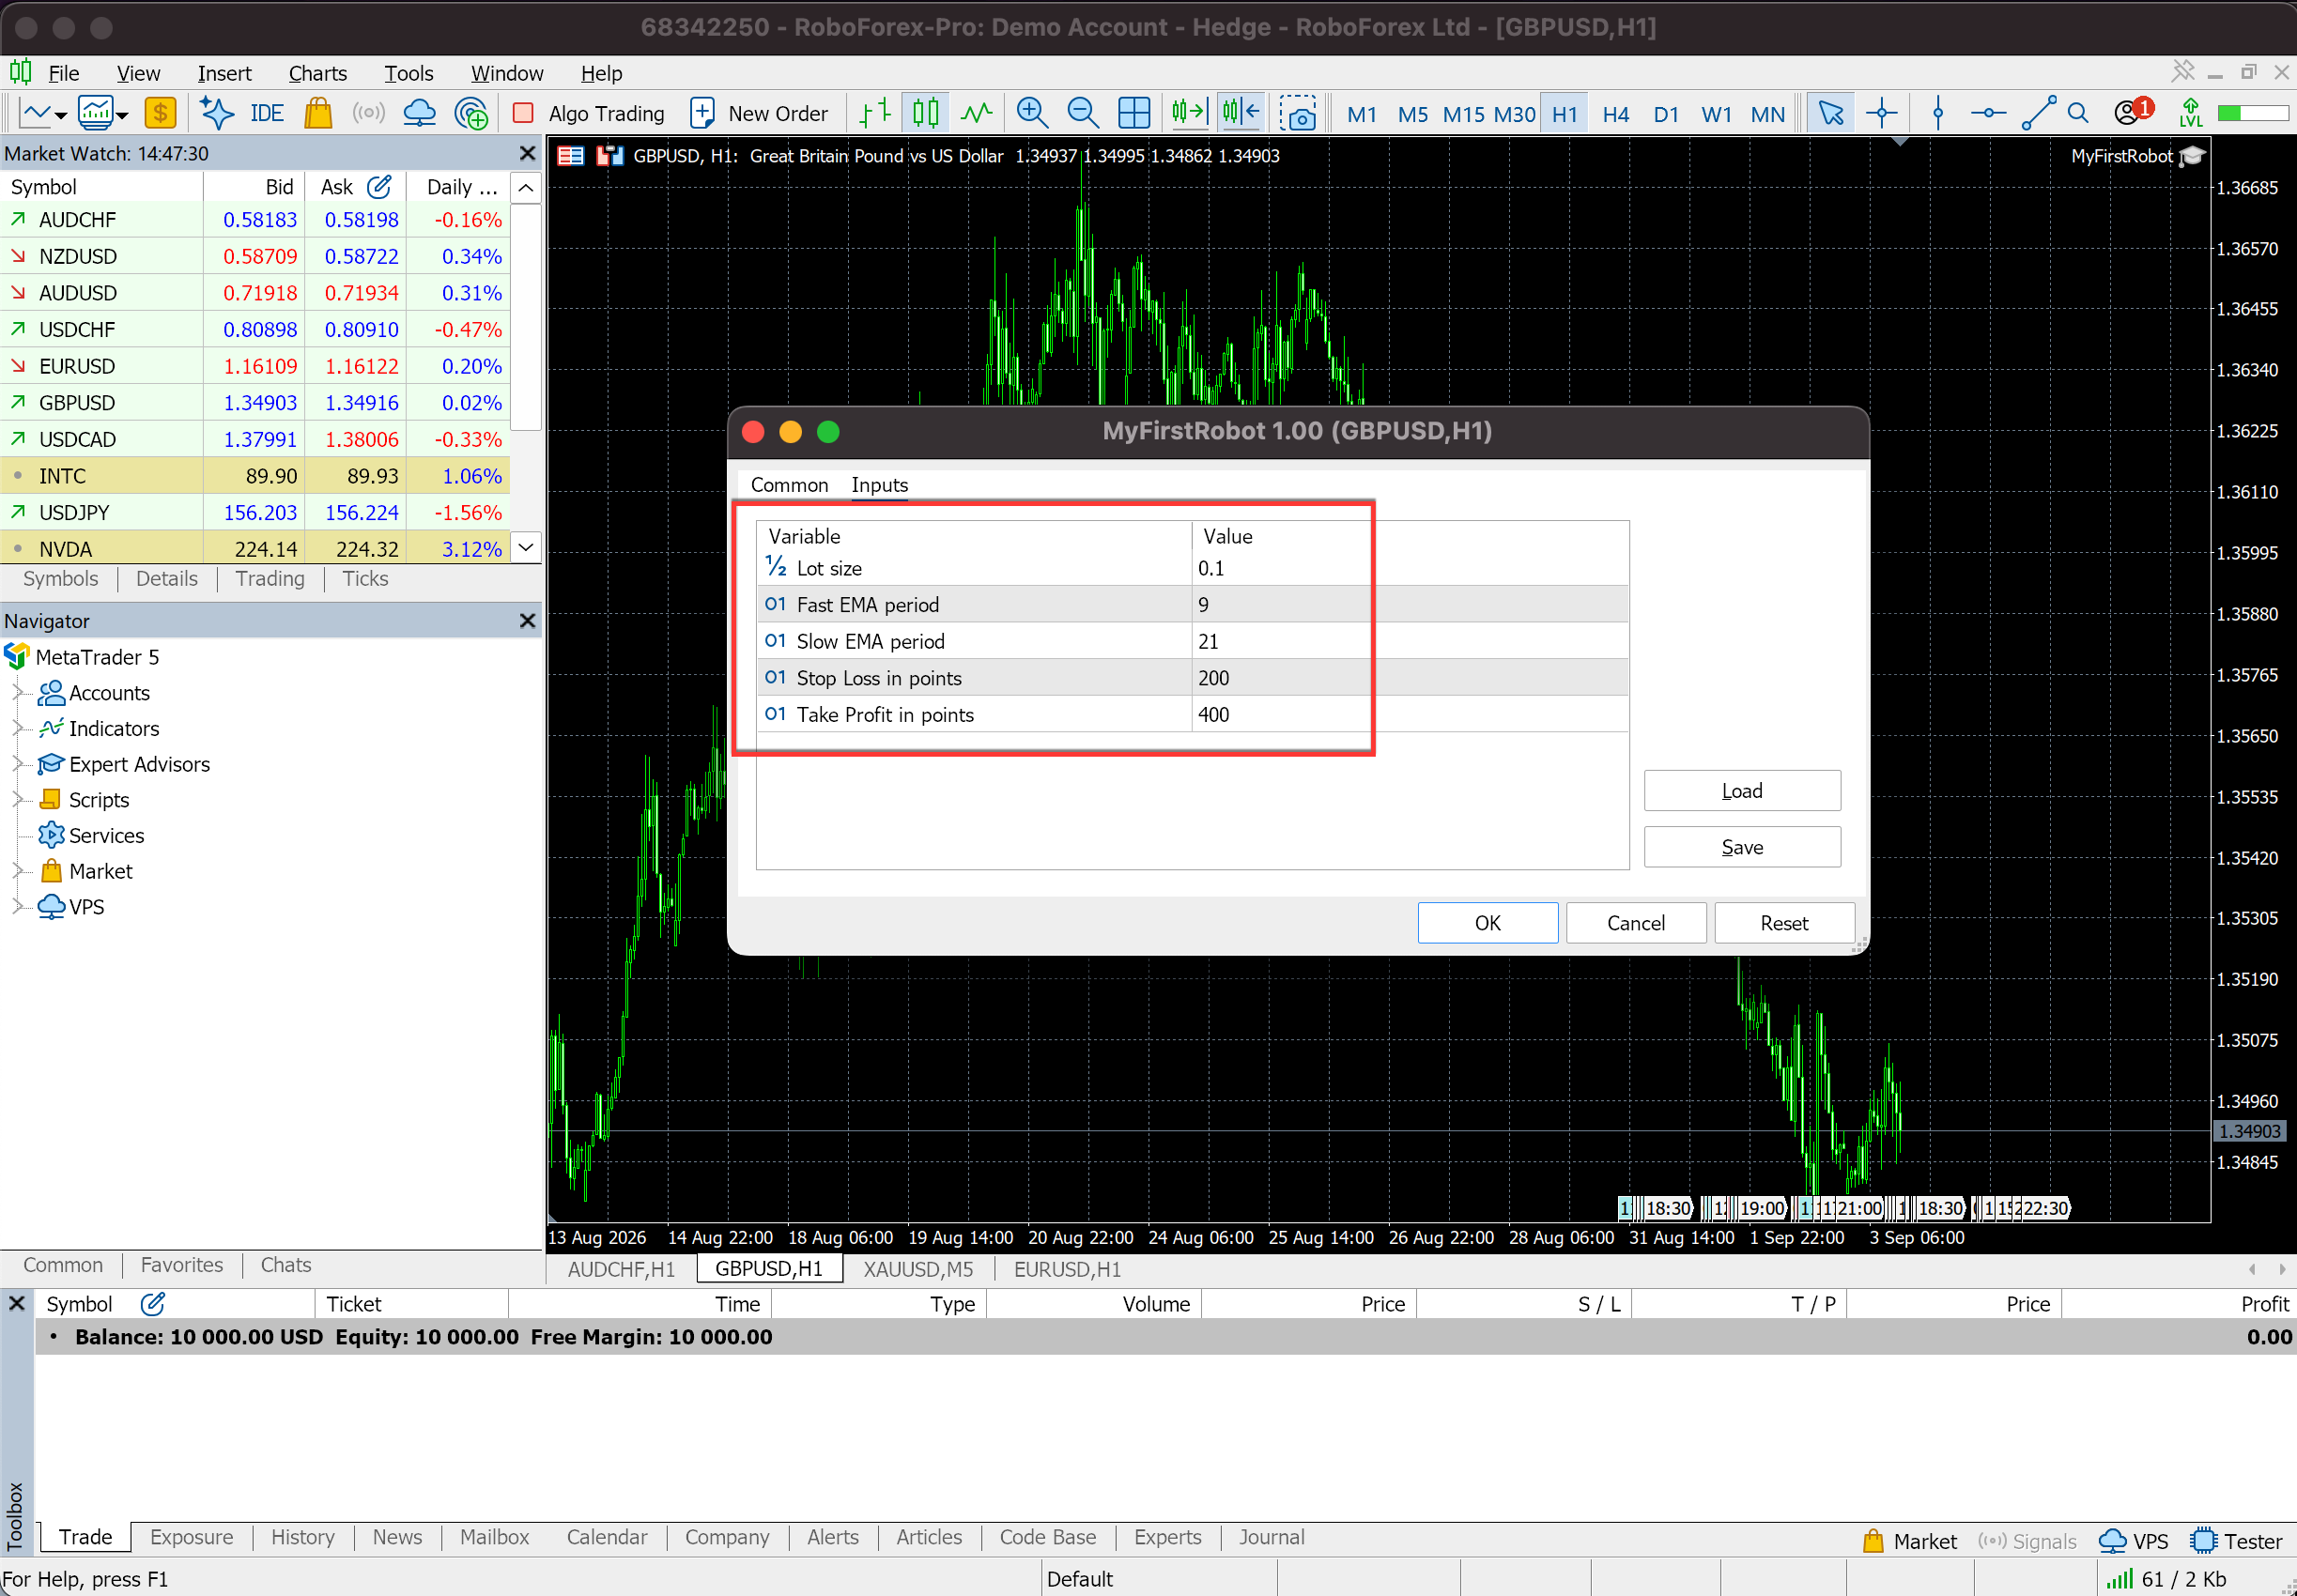
The settings at the top of the file carry the input modifier, which exposes them in the robot's parameter window inside MetaTrader 5. In this example that covers the fast and slow EMA periods, InpFastEMA and InpSlowEMA, along with InpLotSize, InpStopLoss, InpTakeProfit and InpMagic.
The advantage is that changing a setting takes no edit to the source code. Values can be adjusted right before launching the robot, and the Strategy Tester can sweep through them during optimisation.
Initialization with OnInit()
OnInit() runs once when the robot starts, which happens when you attach it to a chart or restart the terminal. It prepares the resources the robot needs later, creating the indicator handles that supply the EMA values.
When that preparation fails, the function returns INIT_FAILED and the terminal stops the robot instead of running it half-configured. It also sets the magic number, the tag that marks every order this robot sends and lets it tell its own positions apart from anything else on the same symbol.
The Tick Event and the New Bar Filter
OnTick() is the main function. The terminal calls it whenever a new tick arrives, meaning any change in the quote. Evaluating the strategy on every tick would be wasted work here, so a new bar filter cuts the processing down to once per candle.
The robot reads the opening time of the current bar with iTime() and compares it with the time it processed last:
if(currentBarTime == lastBarTime)
   return;
When a new candle opens, that time changes and the robot continues. The strategy therefore reacts once per candle instead of following every price change inside it.
After the filter, the robot copies both EMAs with CopyBuffer() and checks for a crossover. Index 1 holds the last closed bar and index 2 the bar before it, so the comparison never touches the candle still forming. EMA 9 crossing above EMA 21 raises buySignal, crossing below raises sellSignal, and only then does the execution block take over.
Why the arrays are declared empty
The two arrays are declared as double fastEMA[] with no size, then passed to ArraySetAsSeries(). That flag reverses the indexing so index 0 is the newest bar, which is how the rest of the code reads. MQL5 refuses to set that flag on an array whose size is fixed in the source, so a sized declaration such as double fastEMA[3] would silently leave the indexing reversed and turn every buy signal into a sell.
Trade Execution
Orders go through CTrade, a class from the standard MQL5 library that wraps the work of assembling a trade request by hand. Depending on the signal, the robot calls trade.Buy() or trade.Sell() and passes the position volume together with the stop-loss and take-profit levels.
Both levels are calculated in points from the current price and then passed through NormalizeDouble(), which trims them to the number of decimals the symbol actually uses. Servers reject prices carrying more precision than the instrument allows, and this is where that shows up.
Before opening anything, the robot checks whether a position on the symbol already belongs to it by comparing POSITION_MAGIC with its own magic number. That check keeps it from closing a trade you opened by hand or one belonging to another robot on the same instrument.
A Ready-Made Template and AI-Generated Code
AI tools have made expert advisors much easier to start. A trader with no programming experience can describe a trading idea in plain words and get the basis of an MQL5 robot back.
There is still a difference between working from a template and generating code from scratch. A model can produce complicated trading logic quickly, and that code still has to be read, compiled and tested. MQL5 is a narrower target than mainstream languages, so a model is more likely to invent a function signature, blend MQL4 habits into MQL5 code, or leave out a safeguard nobody asked for.
| Criterion | Ready-made template | AI-generated code |
|---|---|---|
| Reliability | The structure is fixed and the logic of the example is documented. Compiling and testing are still required. | Depends on the prompt and the model. The code needs the same compile and test pass, from a lower starting point. |
| Safeguards | The new bar filter and the magic number check are already in place. | Safeguards appear when the prompt asks for them. A prompt describing only the entry rule tends to return only the entry rule. |
| Speed to a running robot | High. Paste, compile, test. | High on a simple task. Complex logic often takes several rounds of generating and fixing. |
| Flexibility | Limited to the logic of this robot and the parameters it exposes. | High. The strategy can be shaped around your own rules, indicators and filters. |
| Strategy complexity | Suits simple, legible trading models. | Handles more elaborate concepts, and the more elaborate the code, the more the verification matters. |
| Verification | Required. A clean compile says nothing about whether the trading logic is sound. | Required twice over: the syntax, and whether the code matches the idea you described. |
A ready template is the faster way to see how an expert advisor is put together. AI becomes genuinely useful at the next step, once you have working code in front of you and want it explained, extended or adapted. Most beginners get the most out of both: start from a working example, then use an AI chat to walk through individual blocks and add conditions of your own.
How to Compile and Launch the Robot in MetaTrader 5
With the trading logic in the file, three steps turn it into a robot running on a chart.
Step 1. Put the Code in the File
This uses the .mq5 file the MQL Wizard created earlier. The generated template holds boilerplate code, and all of it gets replaced by the listing above, so the file contains the robot and nothing else.
Step 2. Compile
Compiling converts MQL5 source into the executable format the terminal runs, producing an .ex5 file. Start it with the Compile button on the MetaEditor toolbar or with F7.
The result appears at the bottom of the window. With no syntax errors, the message reads:
0 error(s), 0 warning(s)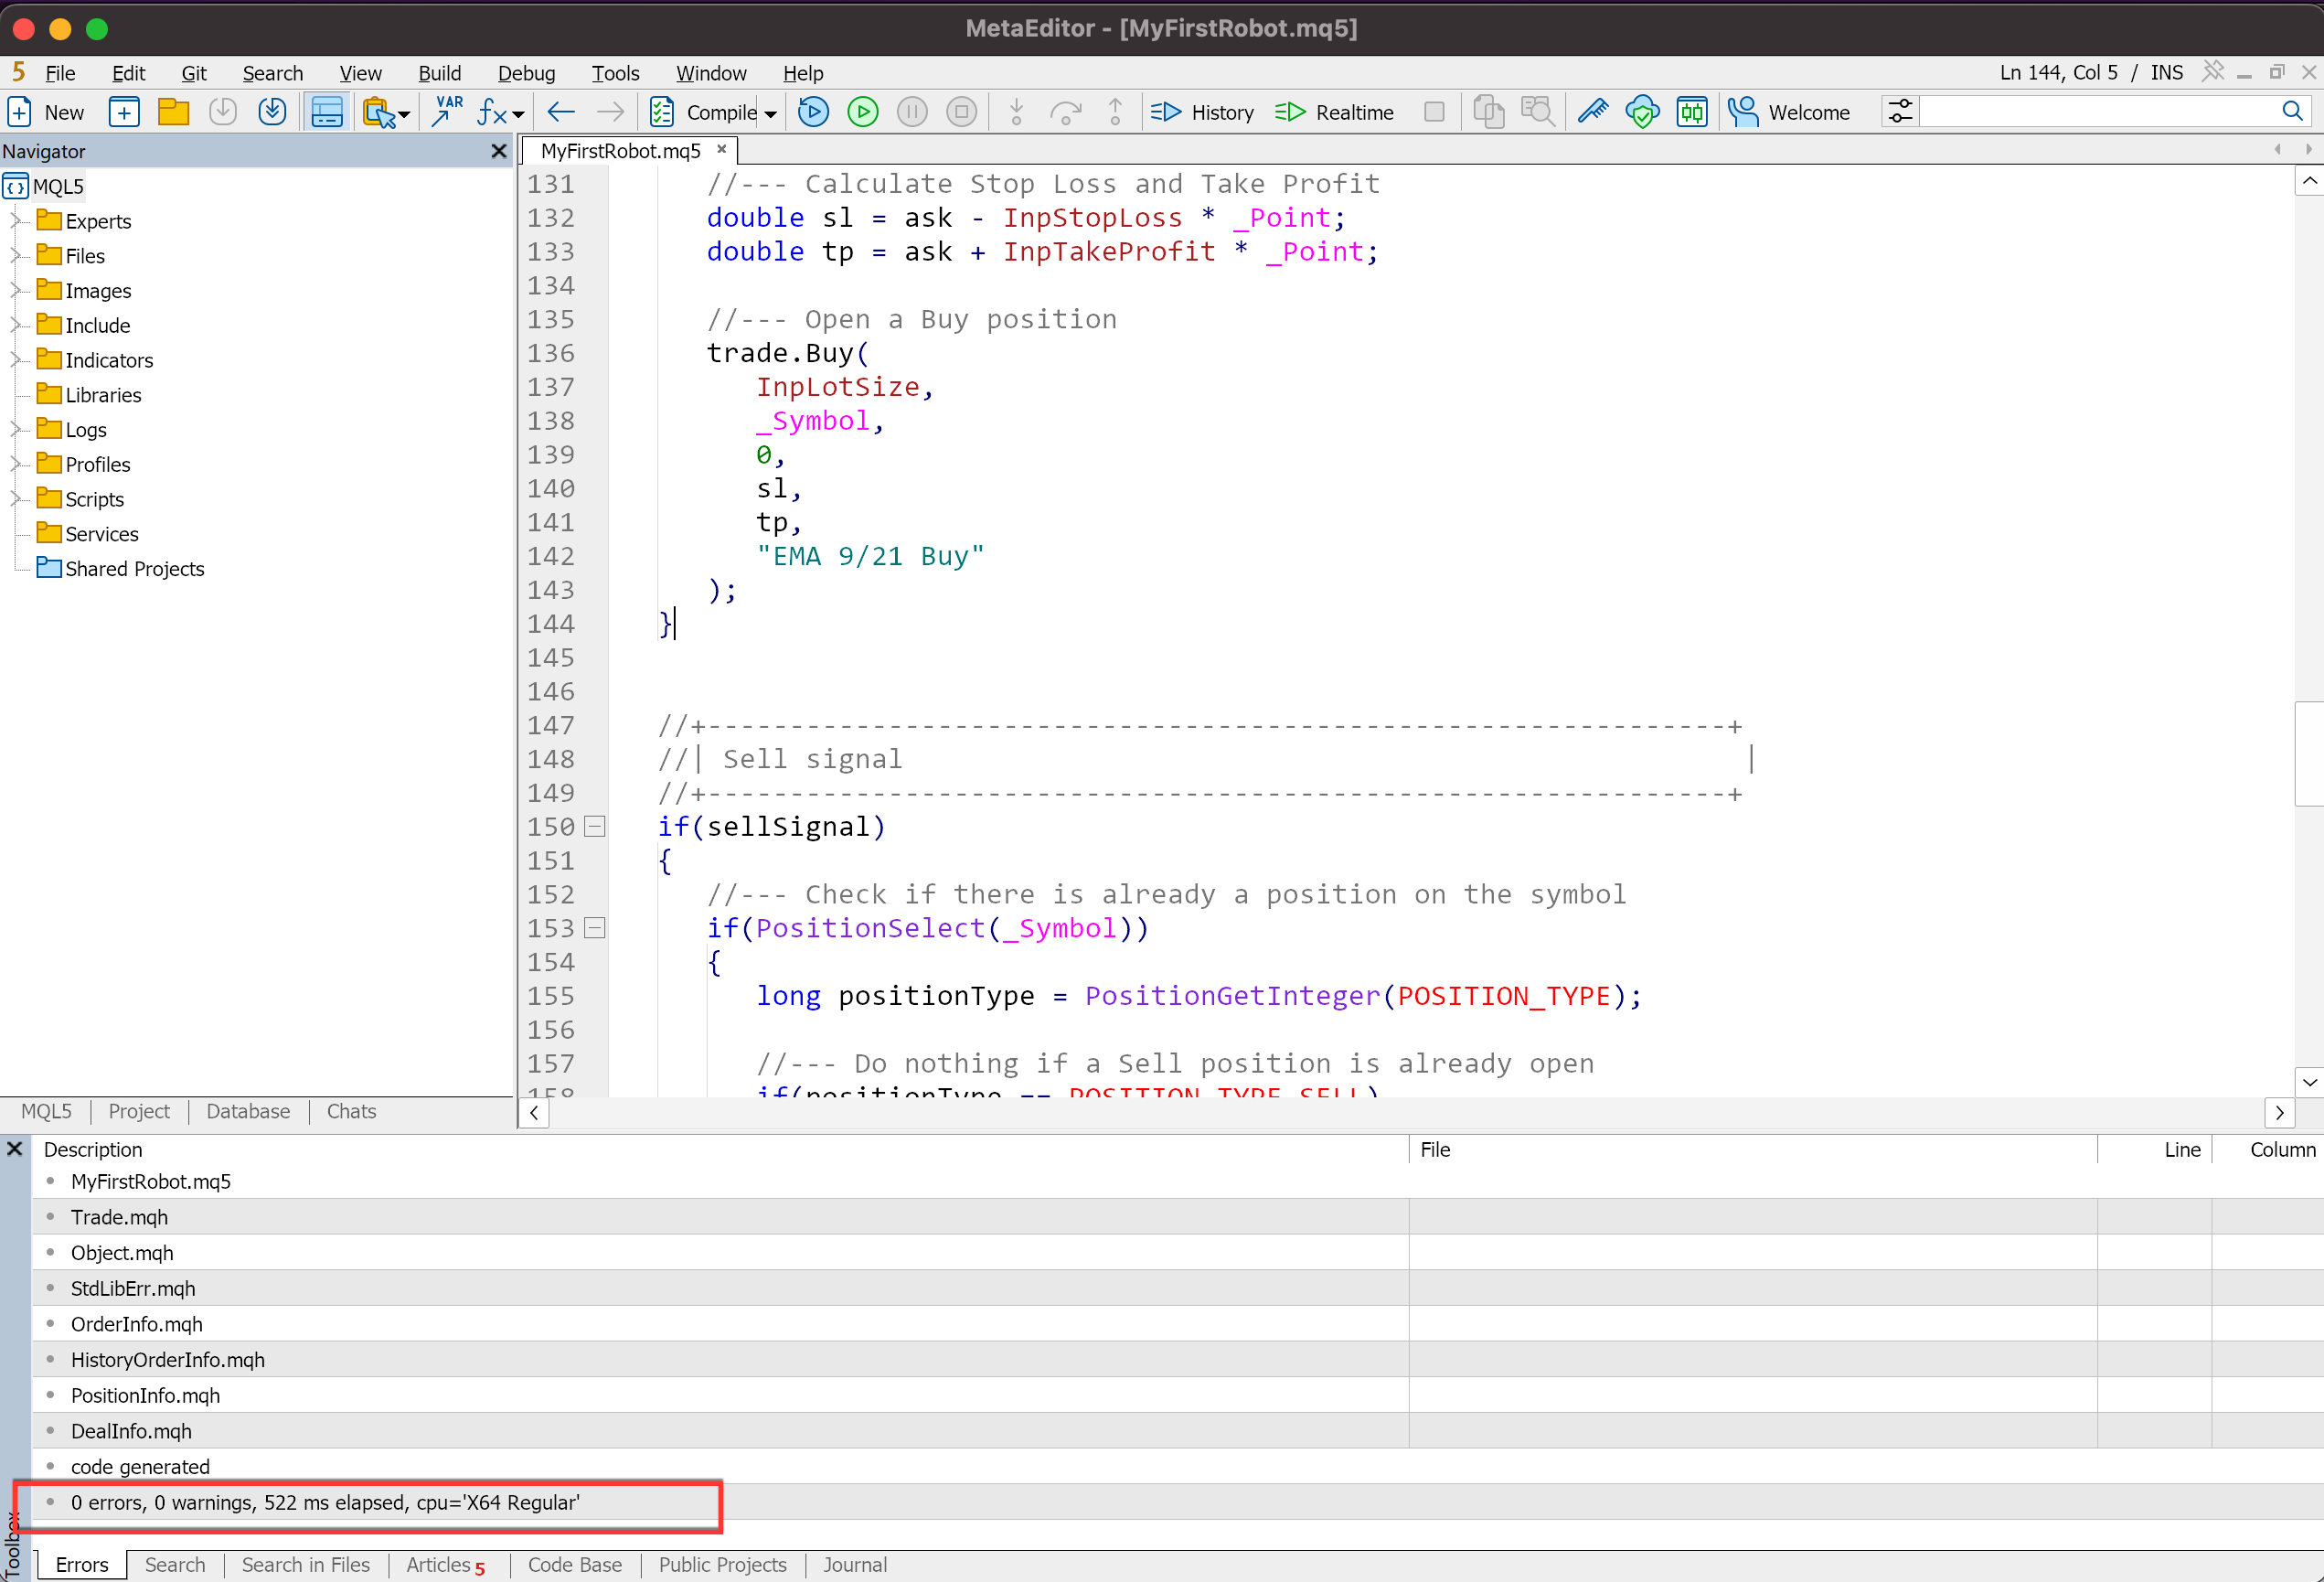
A clean compile confirms the code is valid to the compiler. It says nothing about whether the strategy makes money or whether the logic does what you intended, which is what the Strategy Tester is for.
Step 3. Attach the Robot to a Chart
The compiled robot now appears in MetaTrader 5. Open the Navigator window, go to Expert Advisors and find MyFirstRobot. Drag it onto the chart of the instrument you want it to trade.
The parameter window opens. Check the input settings here, including the trading volume, the EMA periods and the stop-loss and take-profit levels. On the Common tab, confirm that Allow Algo Trading is ticked, then accept the dialog.
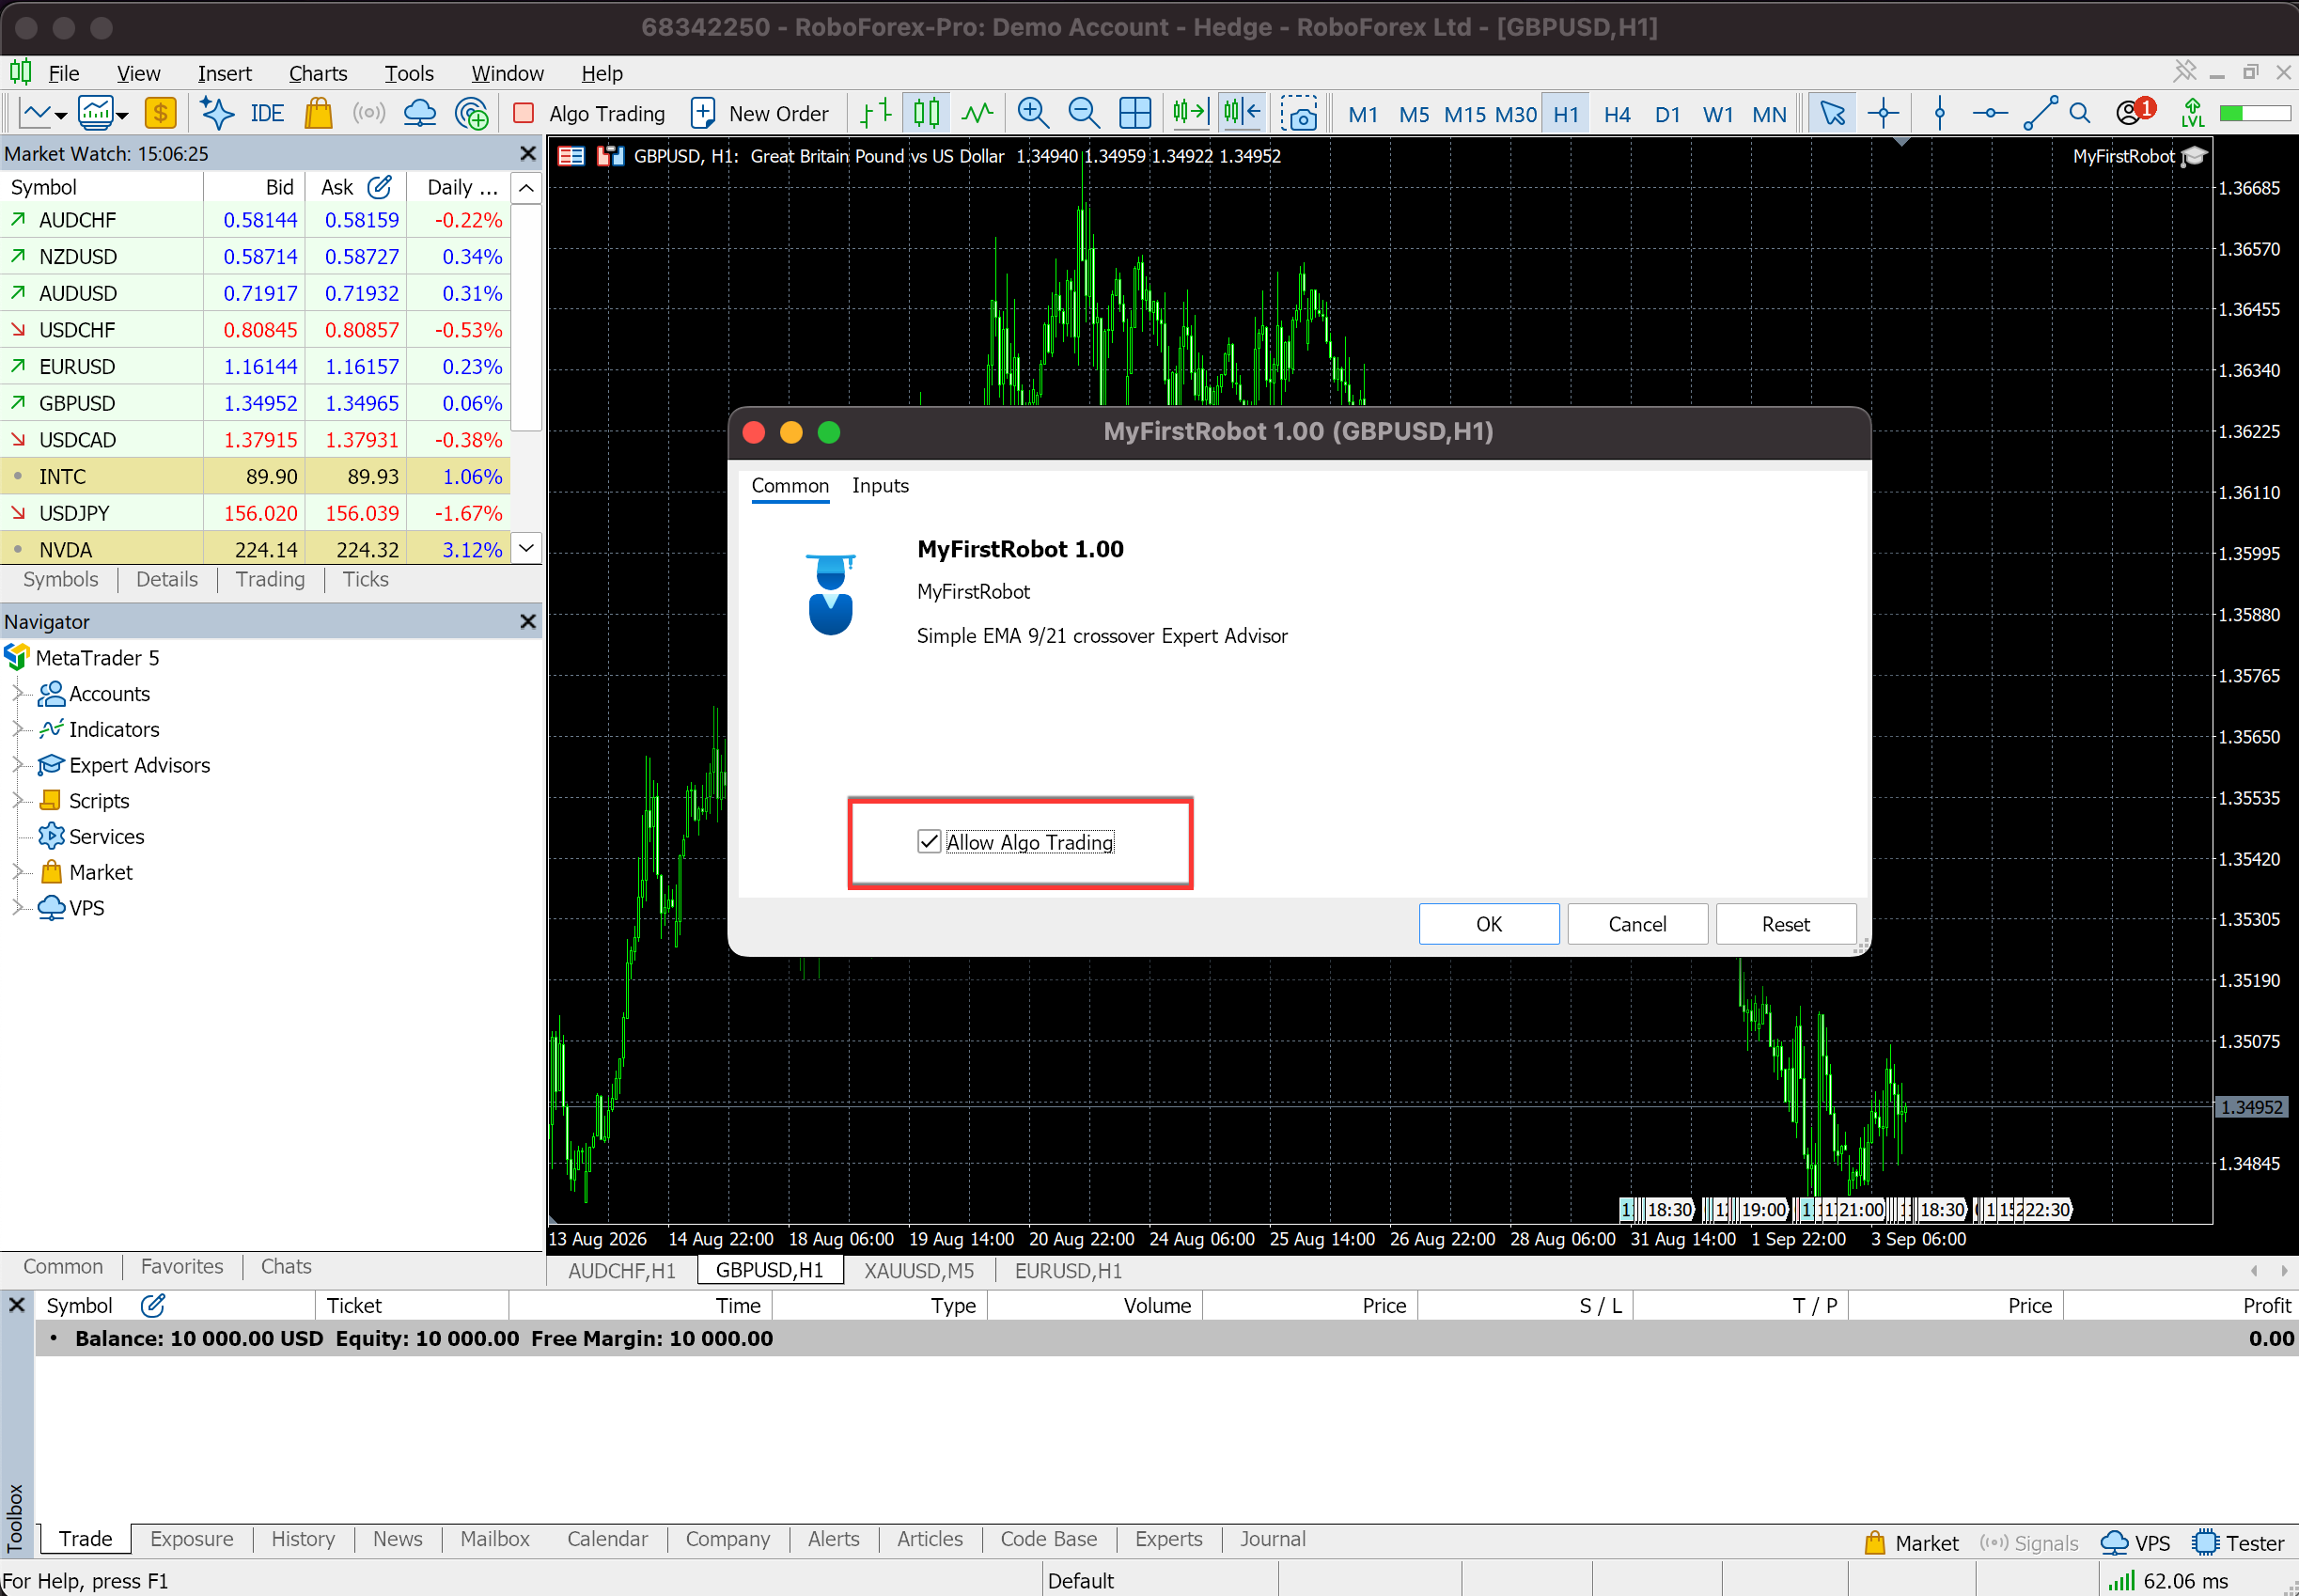
When the Algo Trading button in the terminal toolbar is active as well, the robot can send orders according to its logic and starts following the market on the parameters you set.
Testing in the Strategy Tester
Before a robot goes anywhere near a live account, it belongs in the Strategy Tester built into MetaTrader 5. A test on historical data shows how the robot would have executed its rules across different market conditions, and it surfaces technical faults long before money is involved.
How to Run the Test
Open the tester with Ctrl + R. In its settings, select the MyFirstRobot expert advisor, the instrument, for example GBPUSD, and the H1 timeframe this example is written for. For the most realistic simulation, choose the Every tick based on real ticks modelling mode and set the historical period.
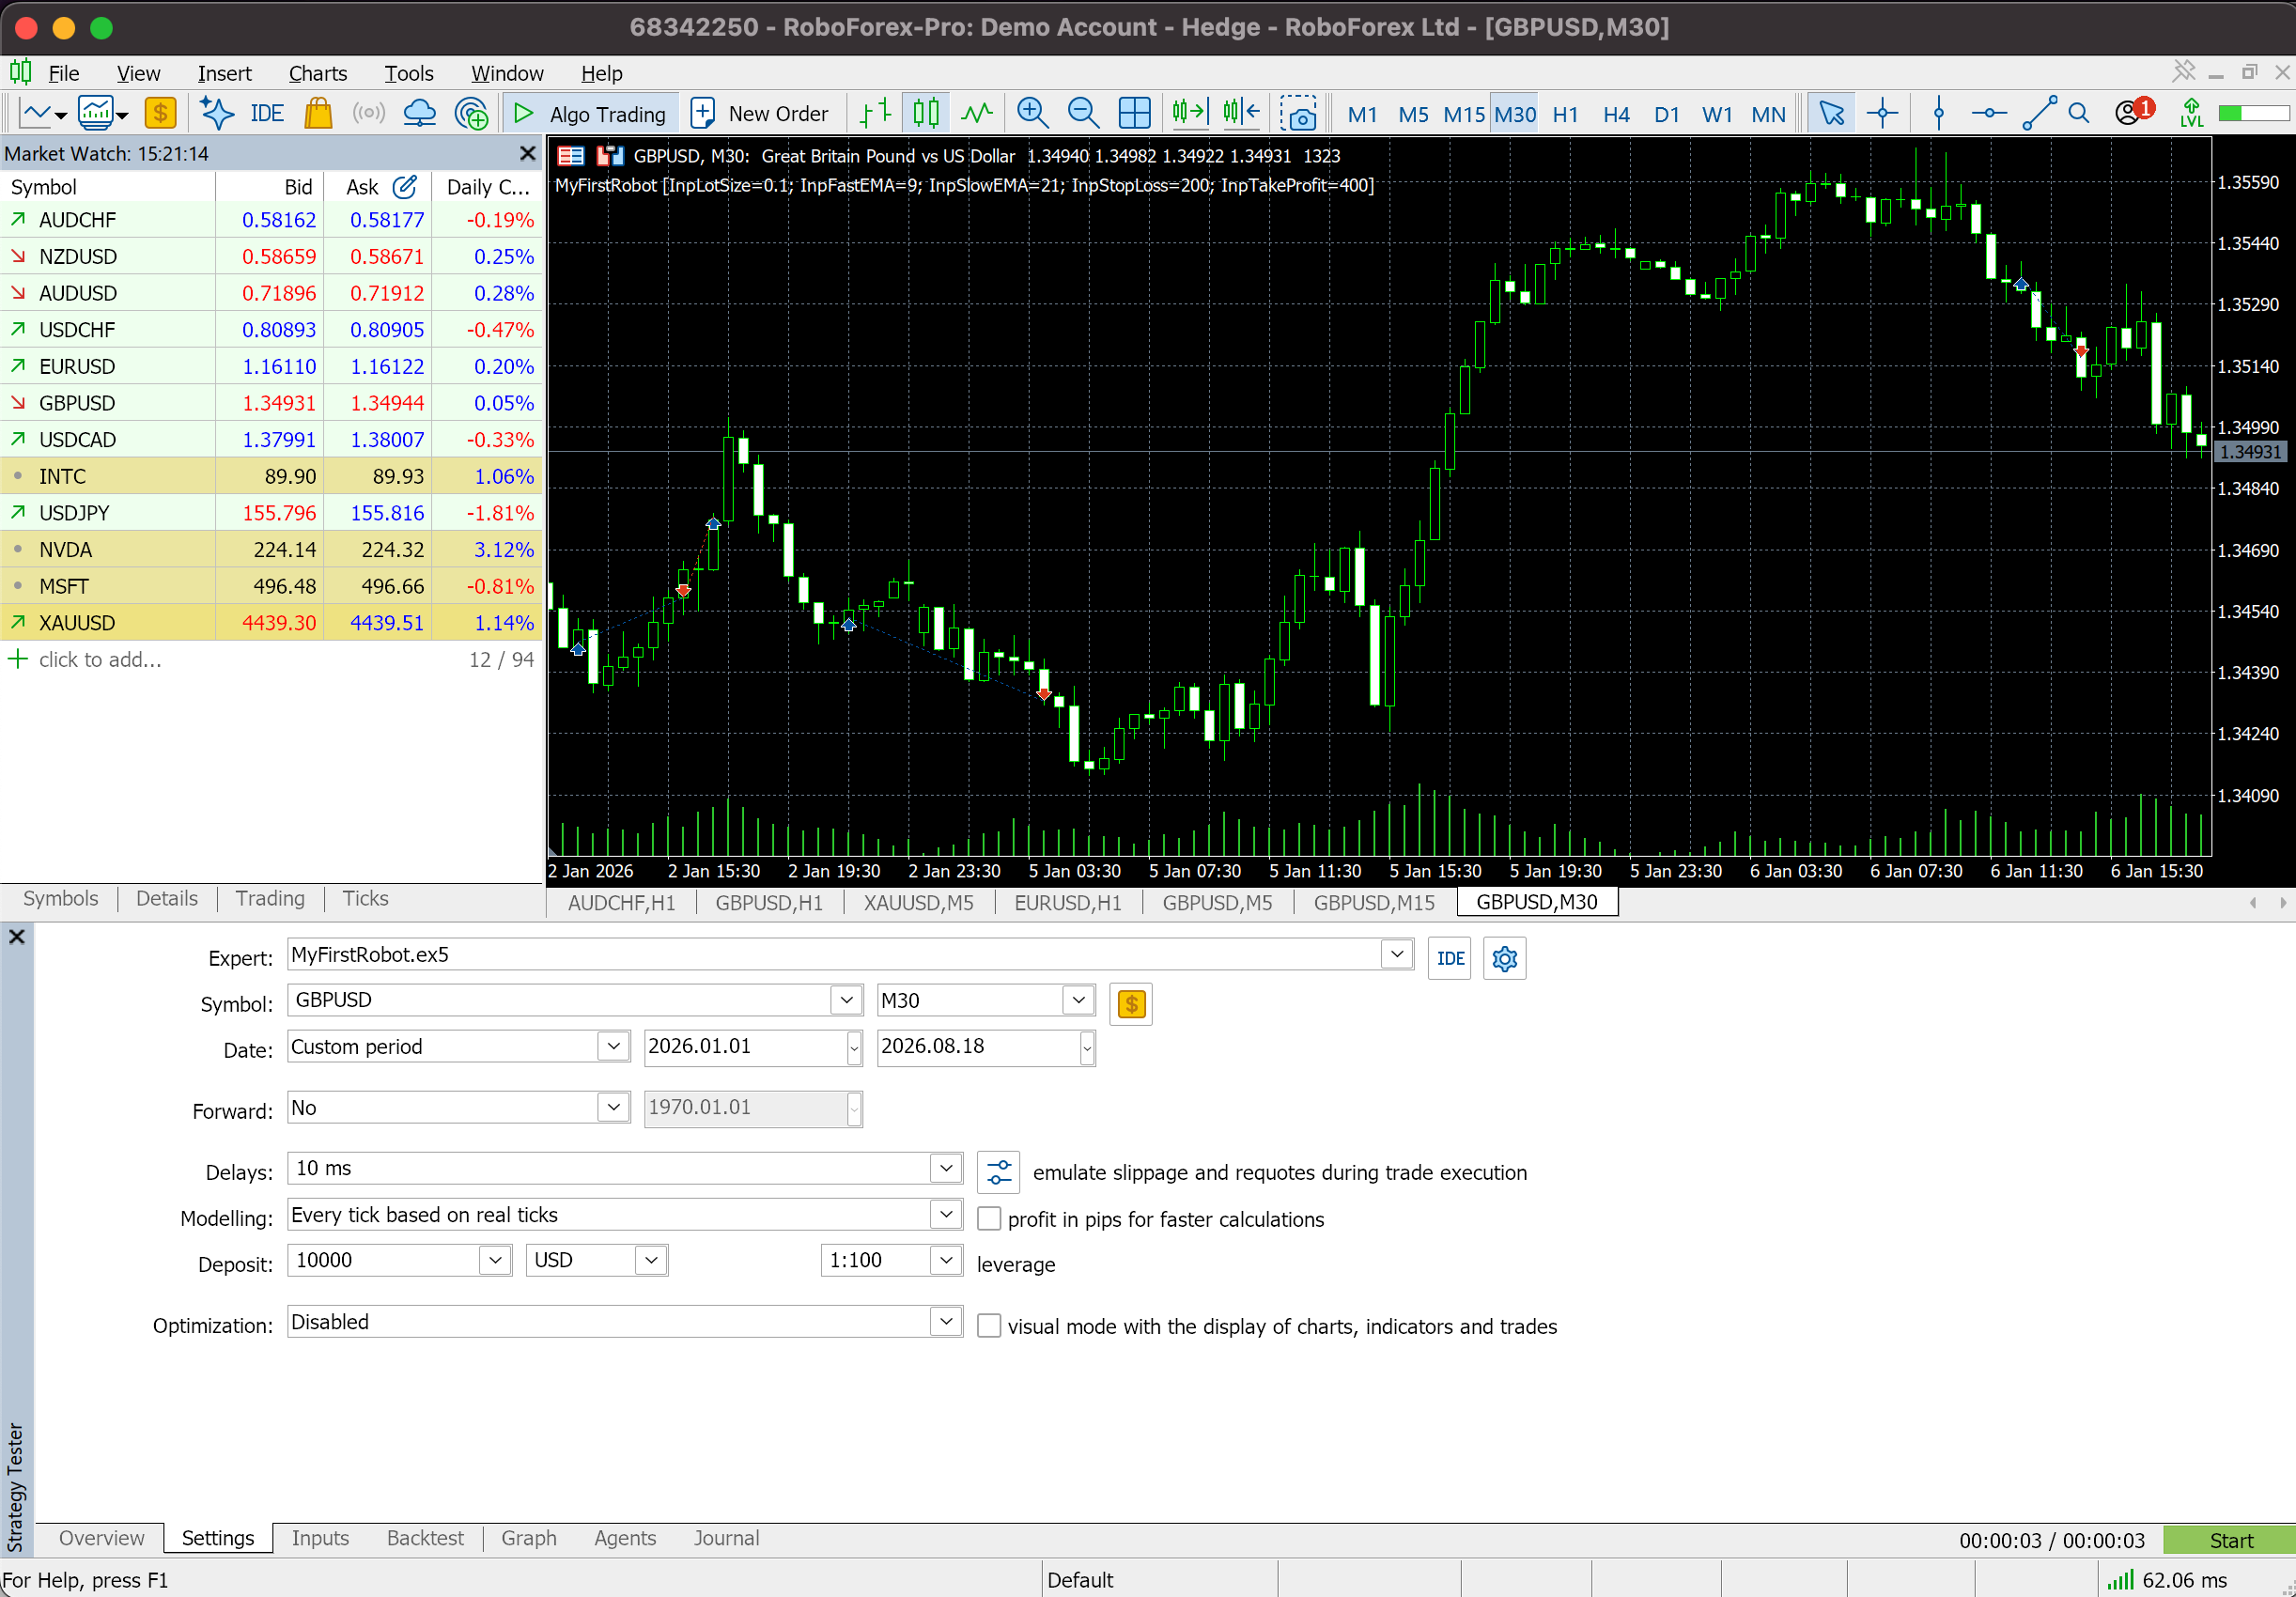
MetaTrader 5 then replays the historical price movement and simulates the robot: signals appearing, positions opening and closing, and the running financial result. Watch that positions open and close as expected and that the stop-loss and take-profit land where they should.
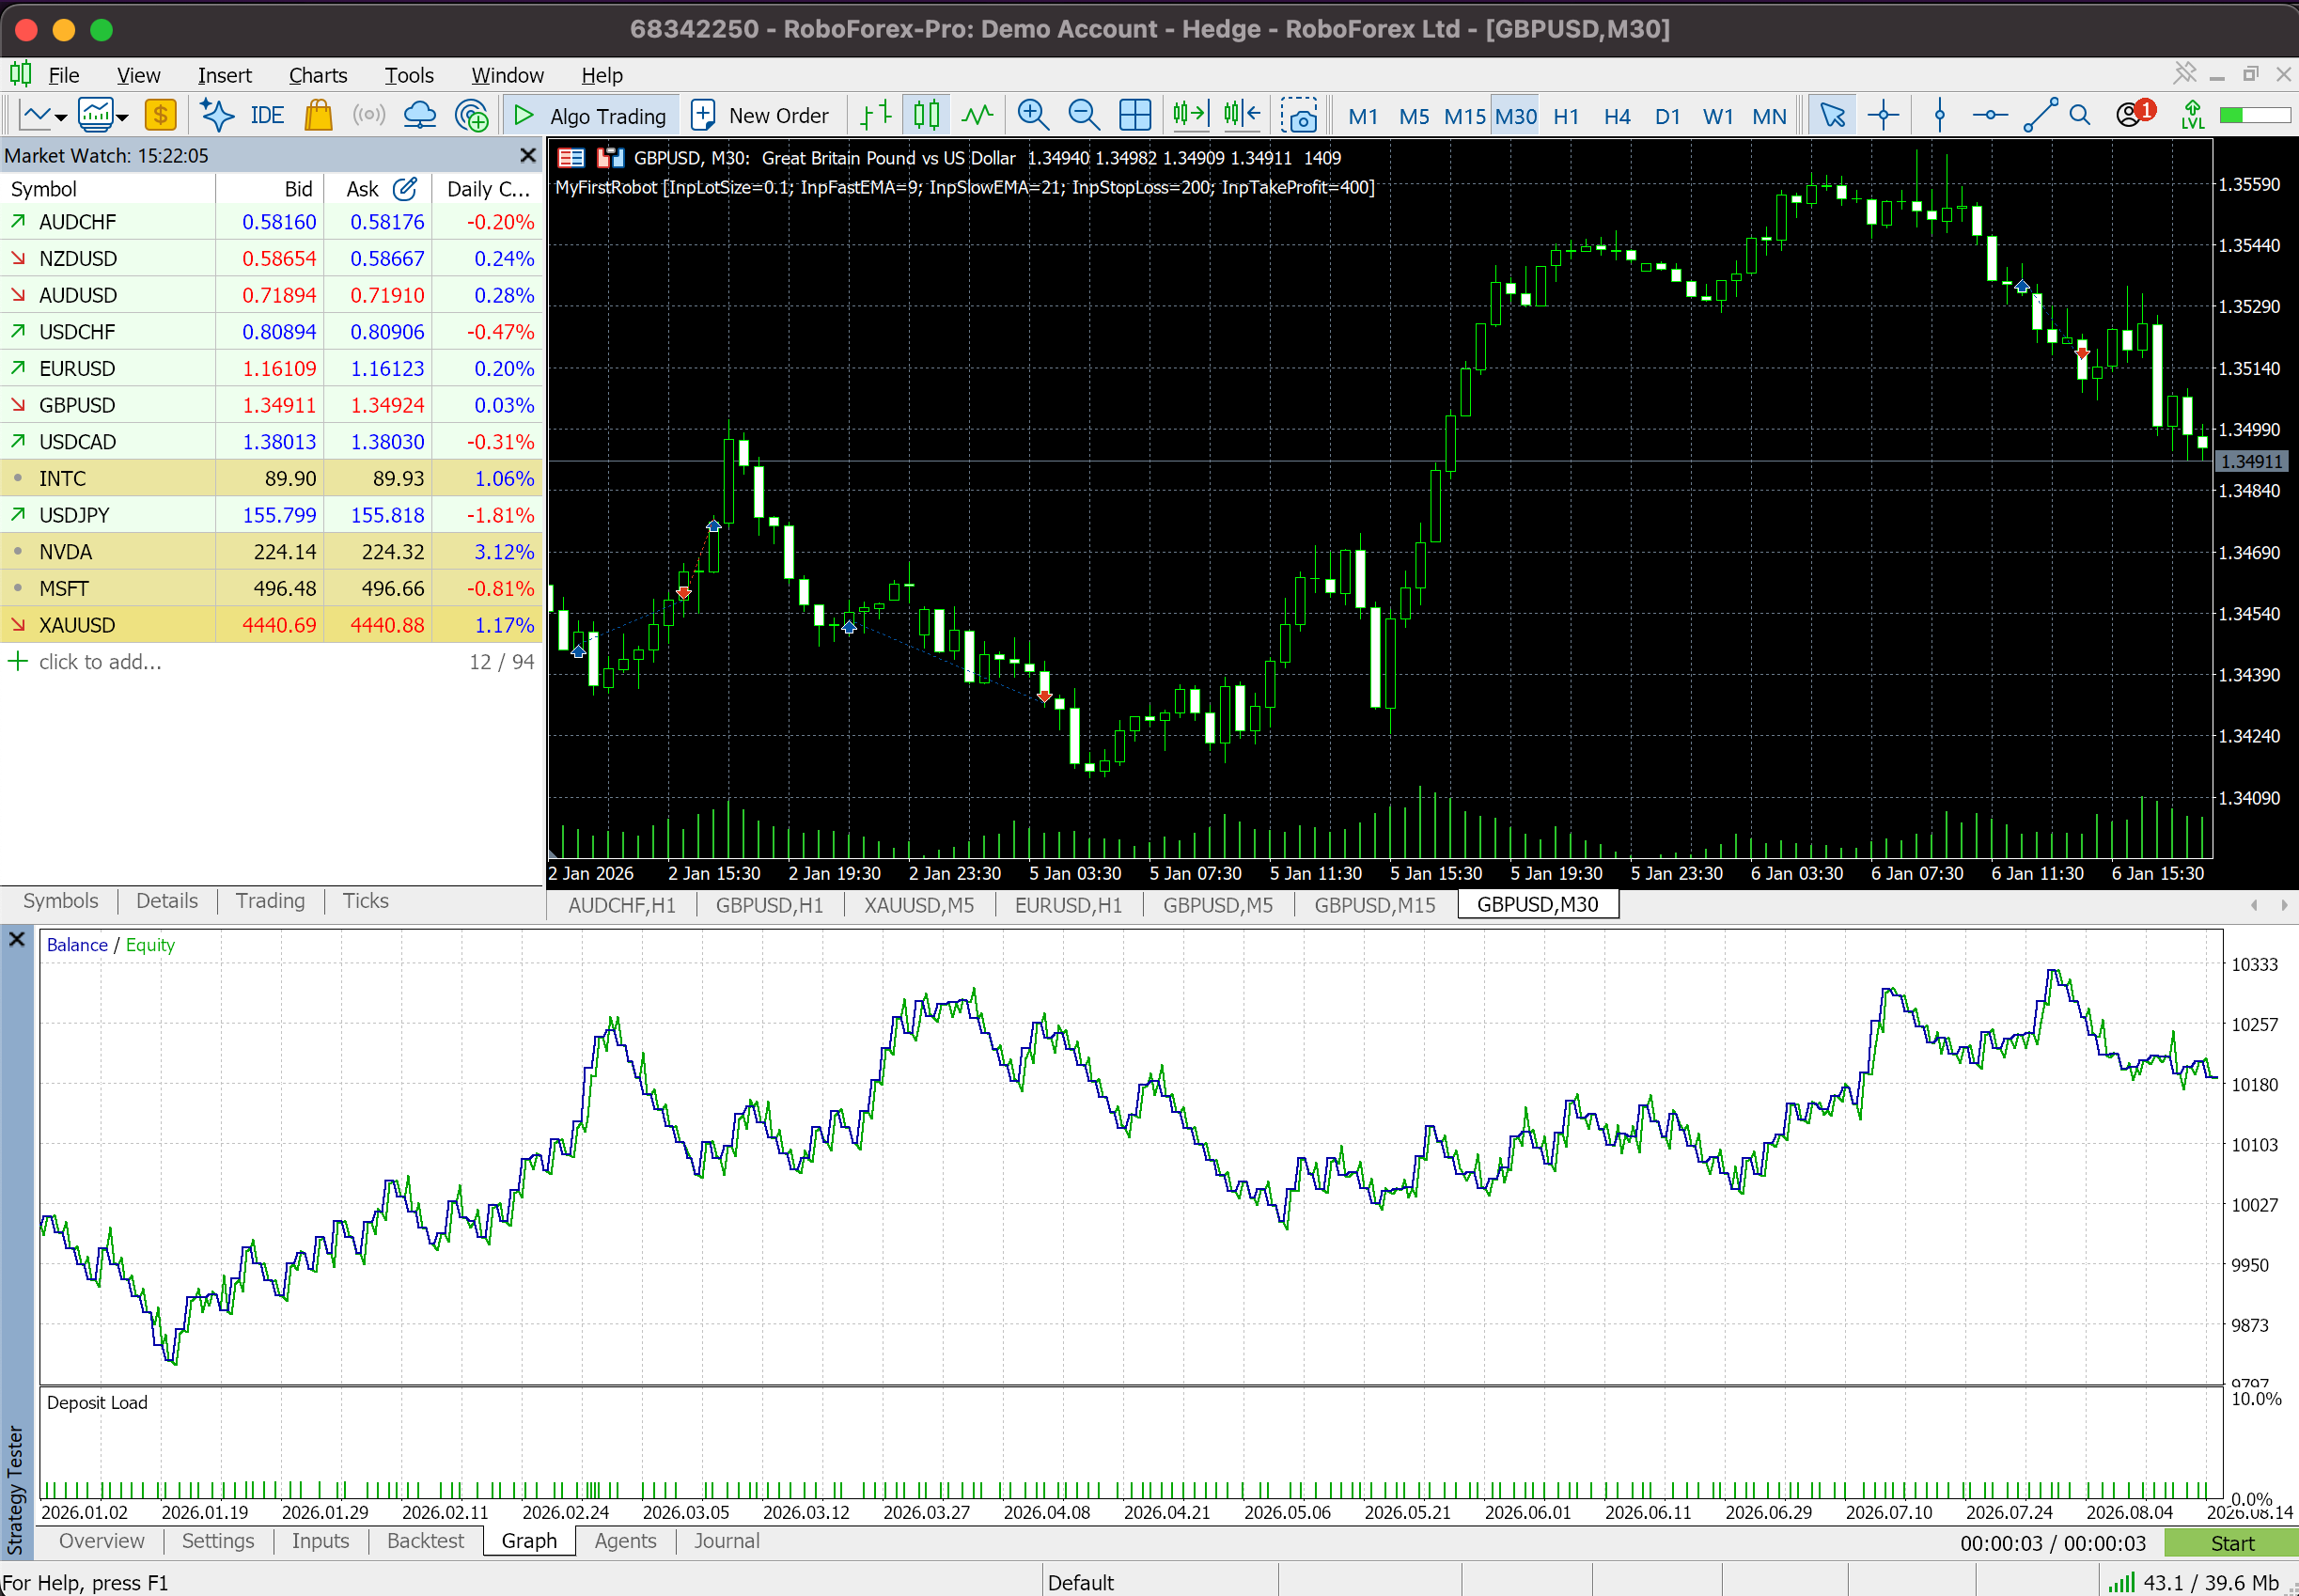
A backtest shows how the rules performed on price history that is already known. It is a check that the robot executes its logic correctly, and it carries no forecast of future income. The more complex a strategy and the more tightly it is fitted to historical data, the more its live results tend to fall short of the test.
For the full tick-testing setup, see A 15-Minute Backtest: How to Test a Trading Robot in MetaTrader 5.
Which Numbers to Read in the Report
MetaTrader 5 produces a detailed report. Four figures are enough for a first assessment.
| Metric | What it shows | What to watch |
|---|---|---|
| Profit Factor | Total profit divided by total loss across the test. Above 1 means winning trades outweighed losing ones. | A low value points to weak statistics. Values above 1.2 to 1.5 are a common first filter, and no universal threshold exists. |
| Max Drawdown | The deepest fall in the balance from a previous peak. | A large drawdown means heavy pressure on the deposit. Read it together with the return and the position size. |
| Total Trades | How many trades the robot made over the tested period. | A small sample carries little statistical weight. A few dozen good trades support no firm conclusion about reliability. |
| Win Rate | The share of profitable trades in the total. | On its own it settles nothing. Read it against the average win, the average loss and the stop-loss and take-profit in use. |
What the Report Shows Beyond the Profit Line
Reading only the bottom-line profit is the most common shortcut among new algo traders. A strategy can post an impressive return while carrying a deep drawdown or resting on a handful of trades. Weigh the profit factor and the final profit together with the maximum drawdown, the number of trades, the shape of the equity curve and how results are spread over time.
One more thing deserves attention: how well the result survives a change of test period or a small change of parameters. When a minor adjustment flips a profitable strategy into a losing one, the strategy is likely fitted to its history.
What a first backtest is for
The goal of a first backtest is confirmation that the robot implements the trading logic correctly and produces nothing obviously broken. Finding an ideal strategy comes later, across other historical periods and then on a demo account.
From the Tester to a Live Chart
A cent account lets the robot trade the minimum lot on live prices, so the first supervised run costs a fraction of a standard account.
The Pre-Launch Checklist
A successful compile does not mean the robot is ready for a live account. Work through these before switching automated trading on.
0 of 5 checked
✓ All five checked. The robot is ready for its first supervised run.
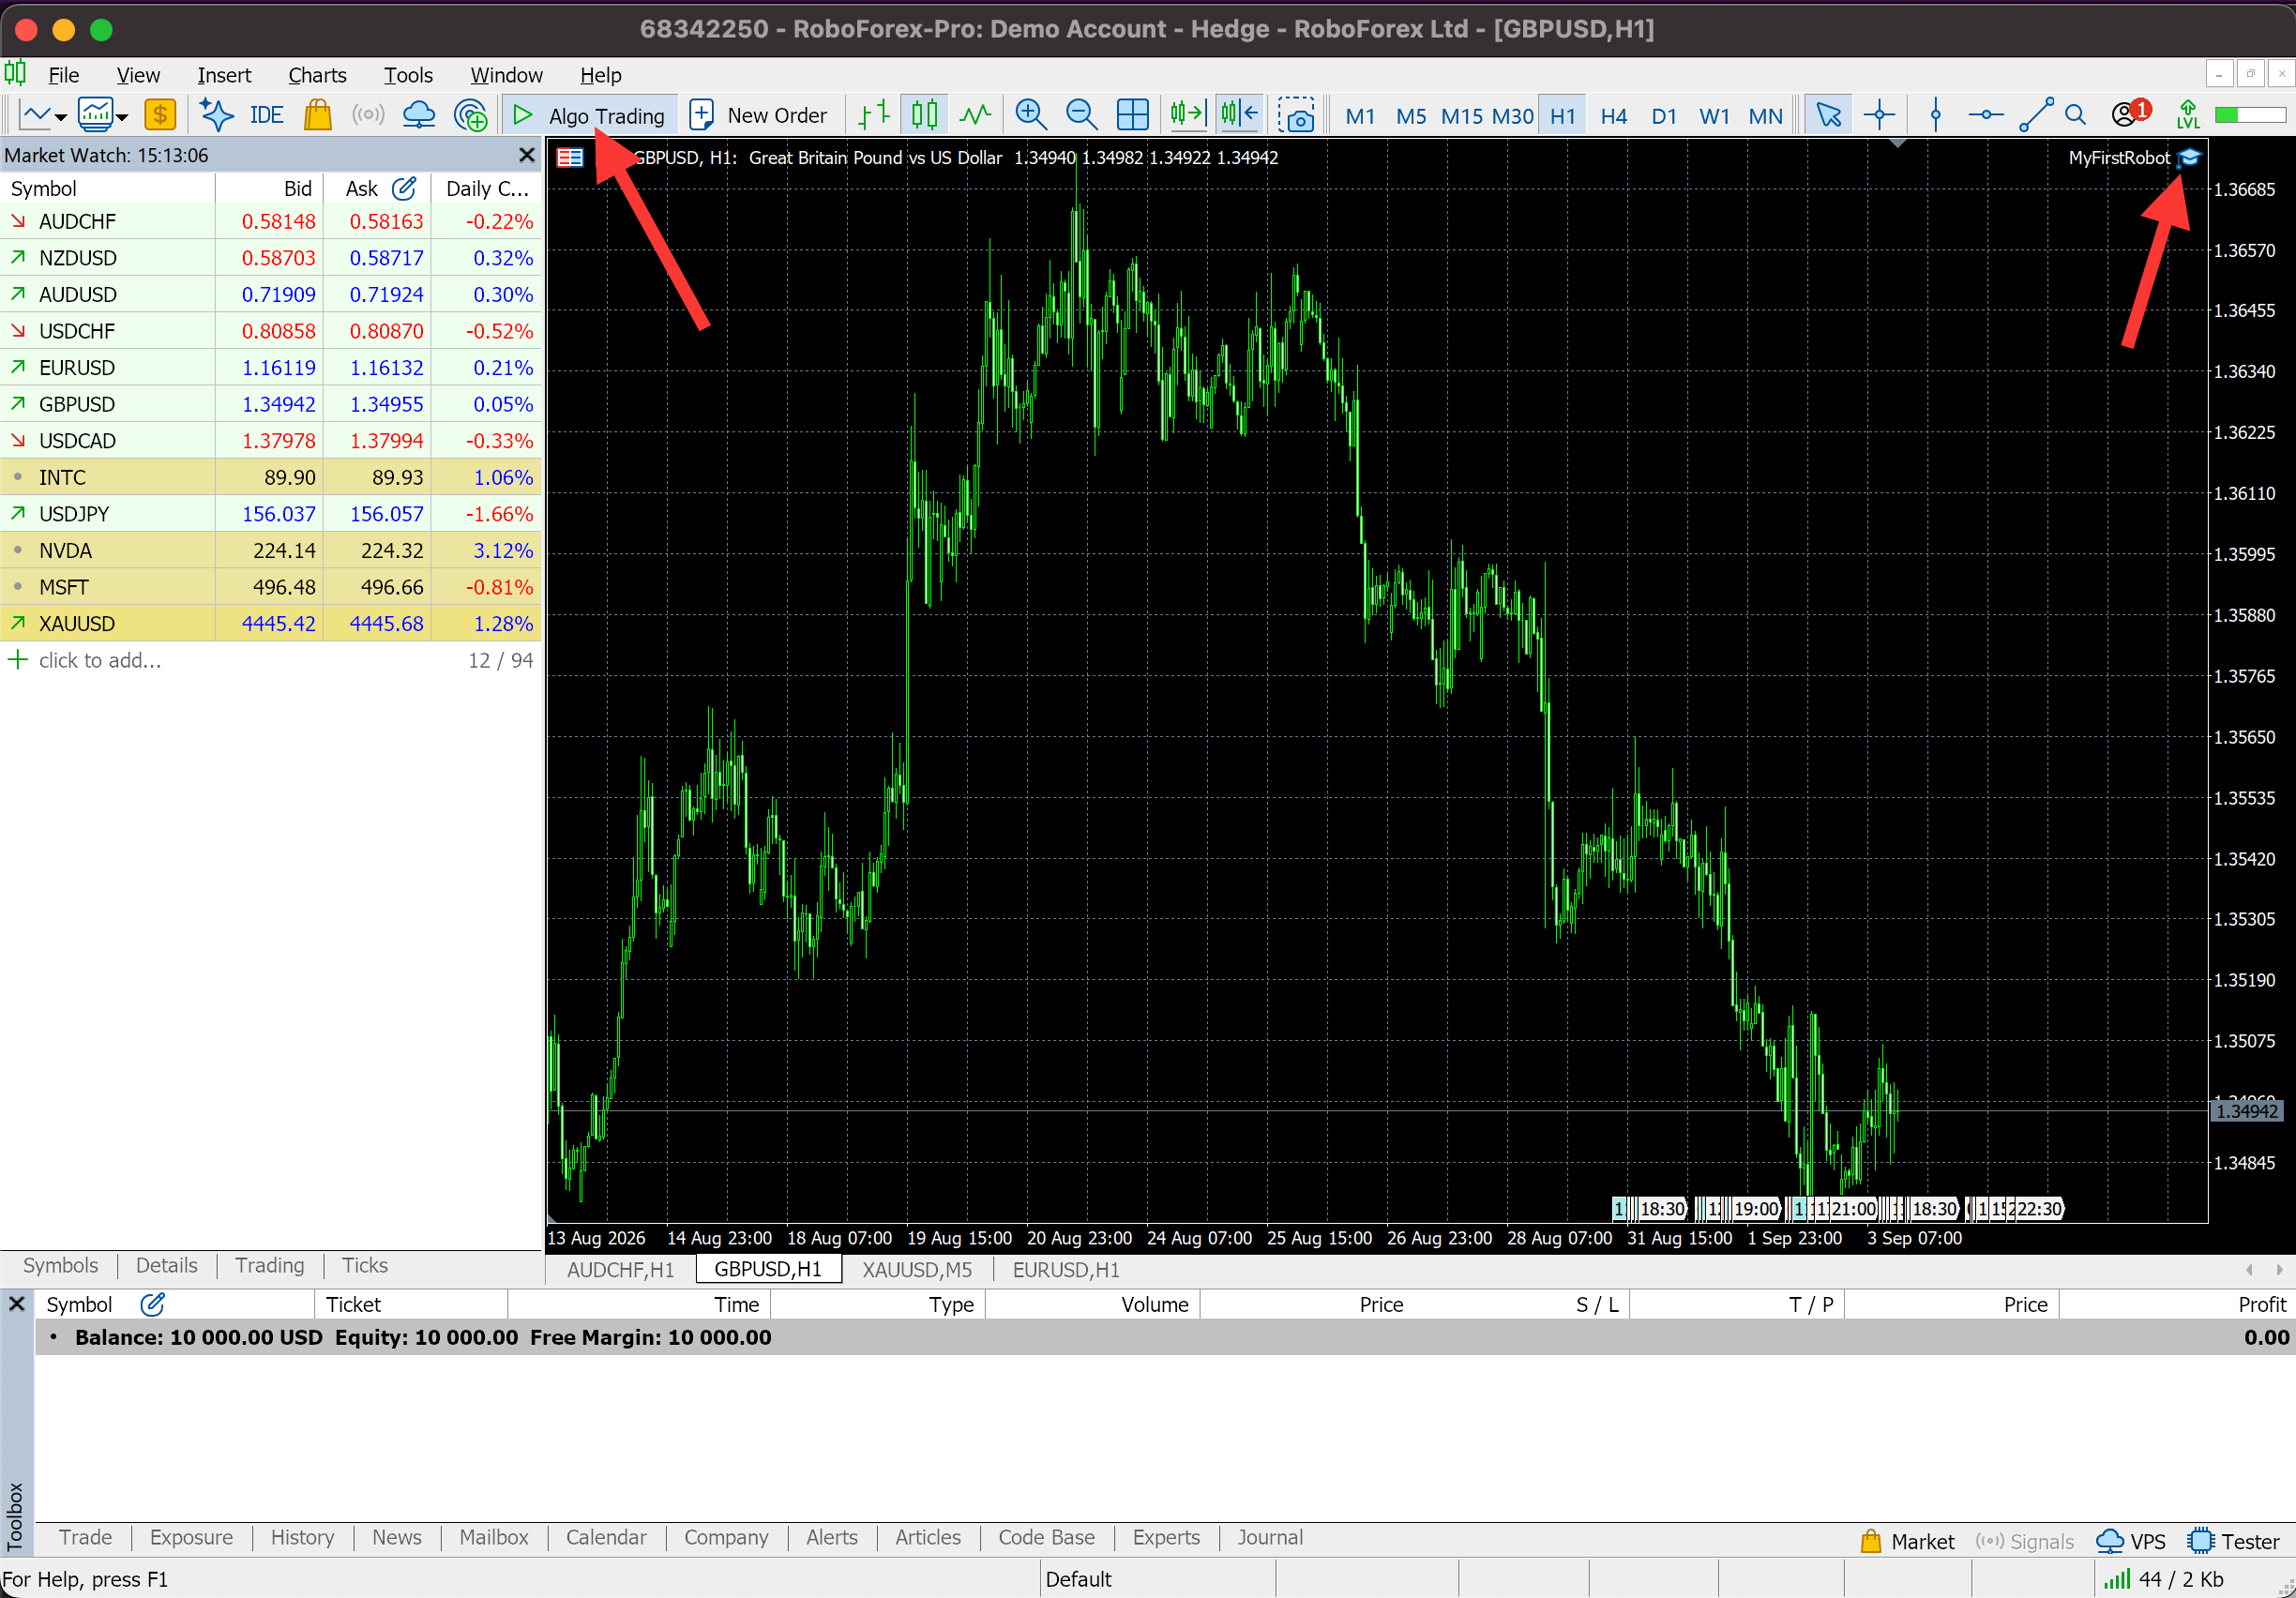
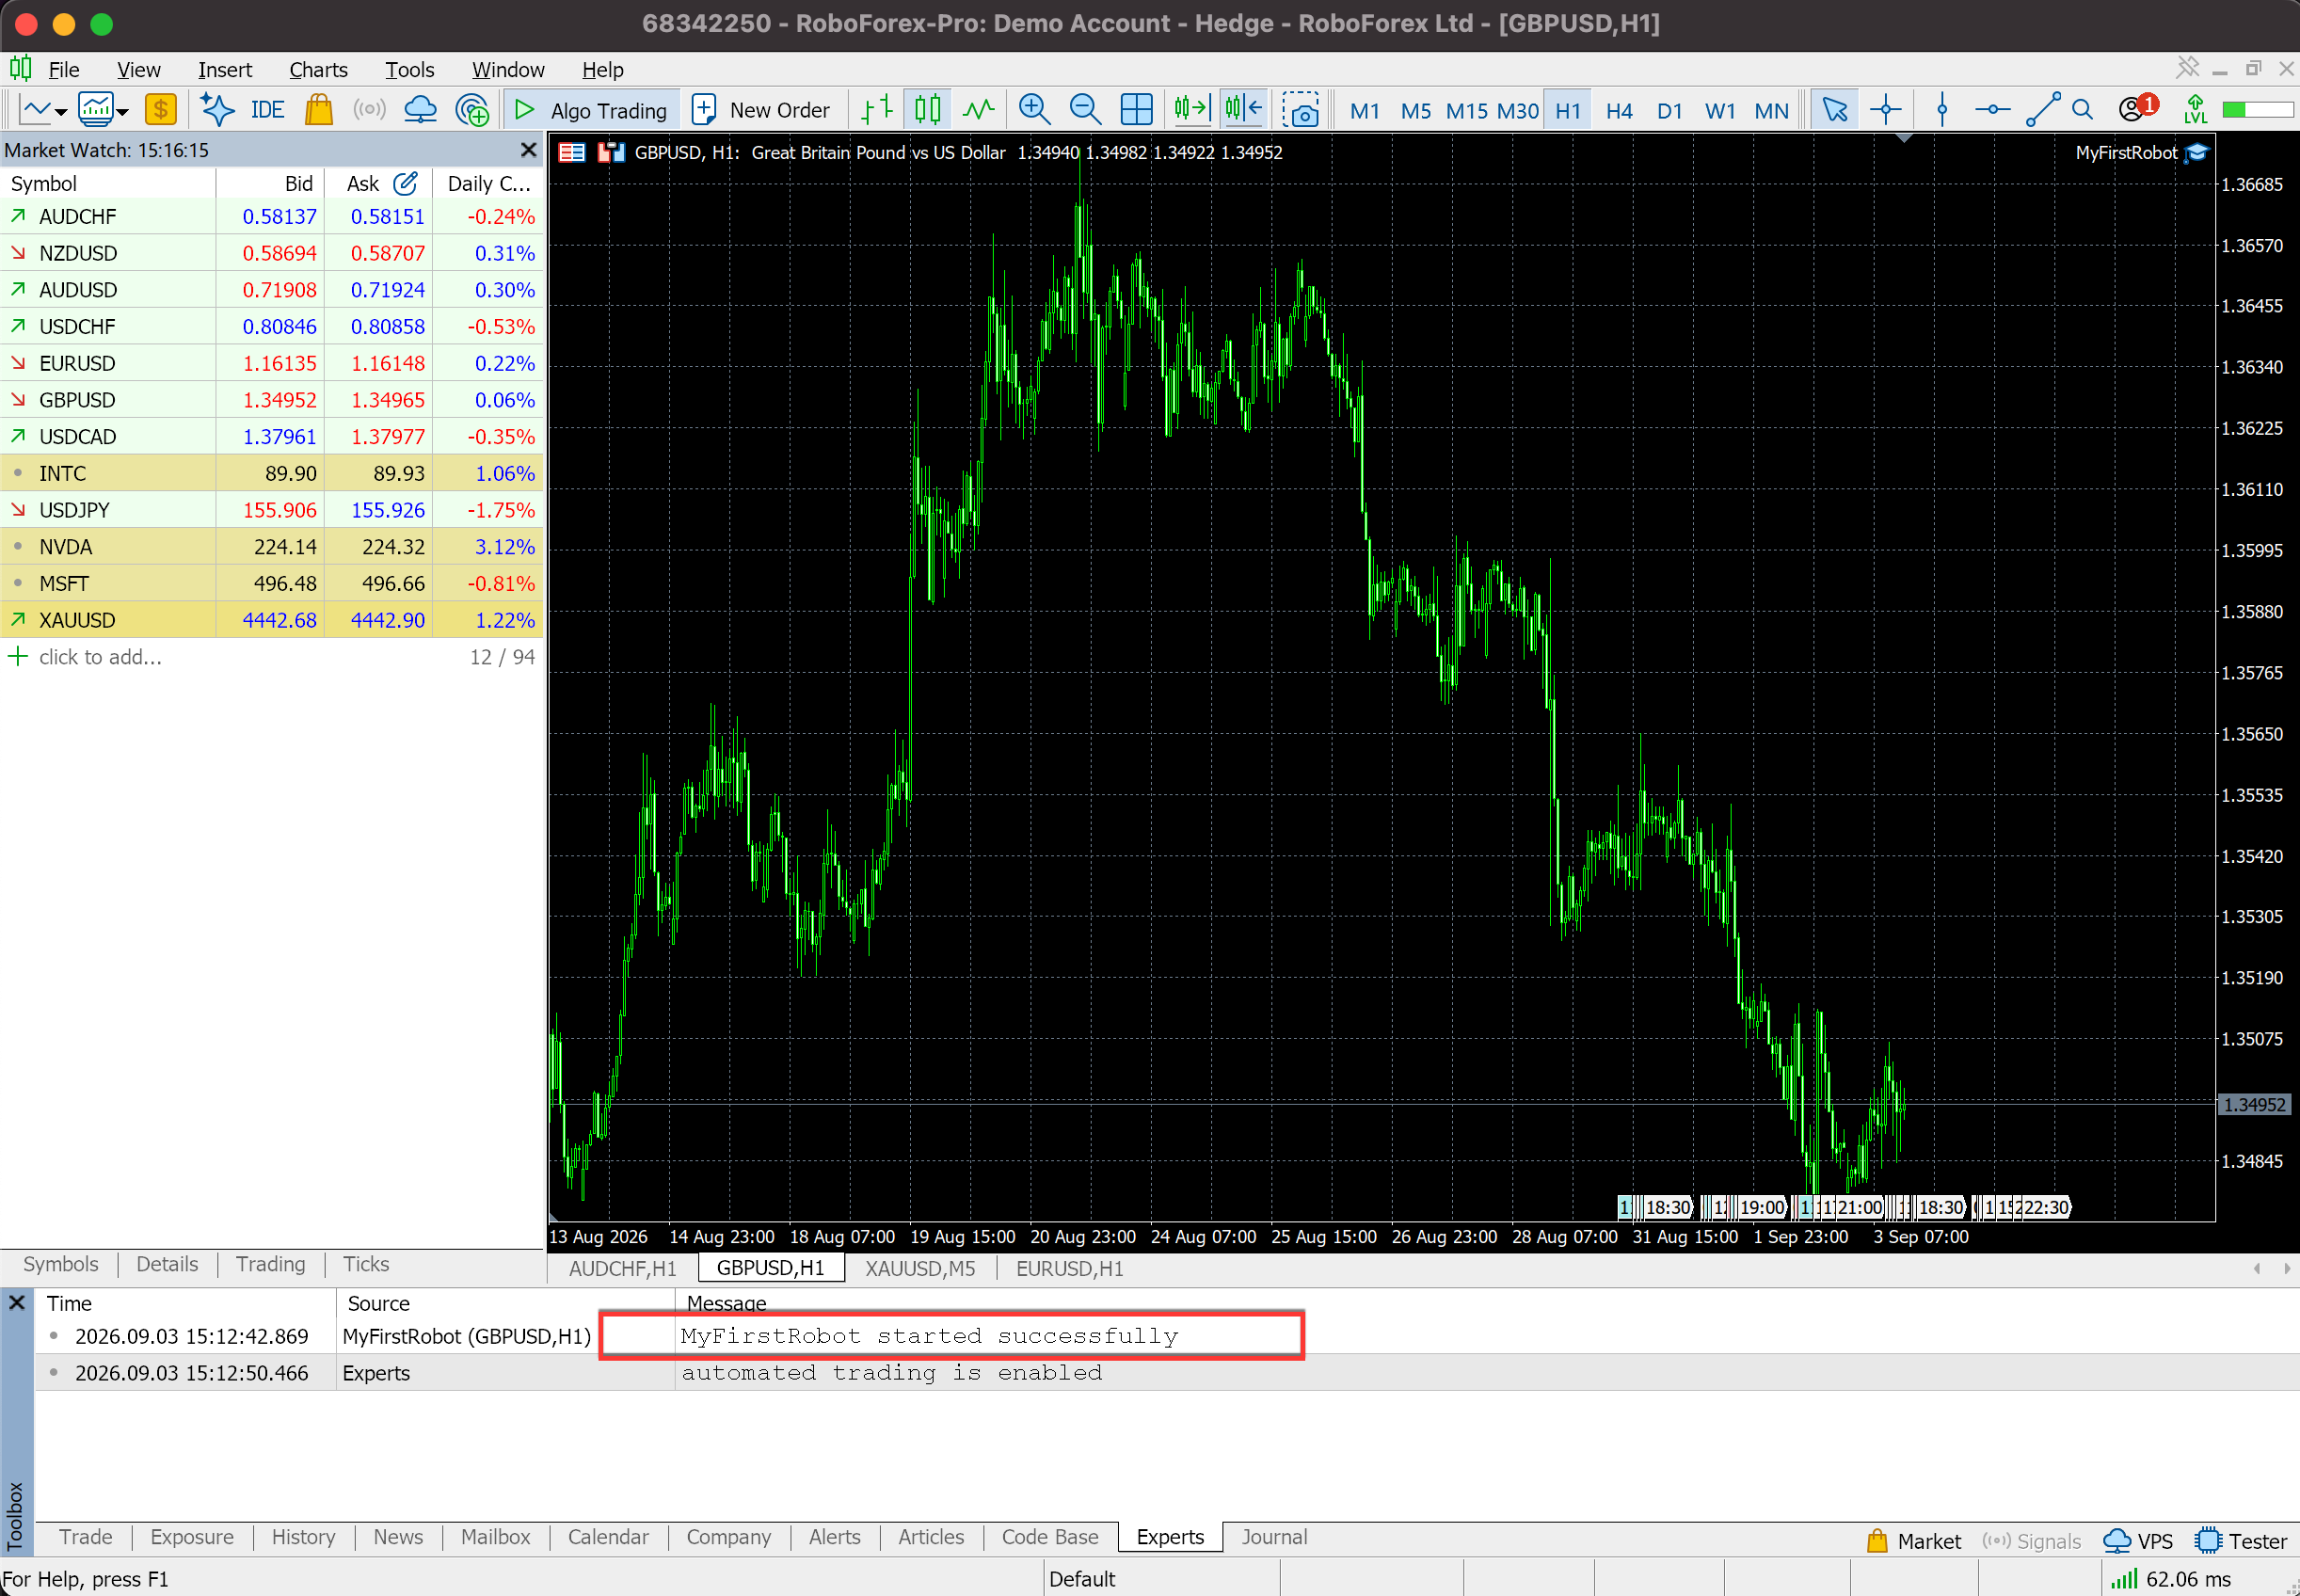
Give the first weeks to watching how the robot behaves in live conditions: that it receives quotes, opens positions only when its conditions are met, attaches its protective orders and takes no trades you did not expect.
Two Situations to Handle on the First Launch
A first launch can surface problems that neither the compiler nor the first test showed. The code compiles, the robot sits on the chart, Algo Trading is on, and still nothing happens. In practice the cause often sits in the account conditions, the instrument settings or the way the terminal is running. Two cases come up most often.
The Robot Stays Silent Because of Margin
Picture a robot on GBPUSD H1. EMA 9 crosses EMA 21, and no position appears. The first place to look is the Journal tab and the messages under Experts. A line reading Not enough money points at free margin.
Opening a position makes the broker reserve part of the account as margin collateral. The amount depends on the trade volume, the price of the instrument, the contract type, the leverage and the account conditions. A fixed InpLotSize = 0.1 can be too large for a small deposit on some instruments, so the lot size only makes sense read against the balance and the available margin.
Check that the account holds enough free funds for the volume you configured. The required margin per lot is listed in the instrument specification in MetaTrader 5. On a small account, the minimum allowed volume is the sensible starting point. Sufficient margin and a safe position size are separate questions: having enough margin to open a trade says nothing about what that trade can cost you.
Practical tip
When the robot skips a signal, read the Experts and Journal tabs before touching the code. The terminal message usually names the reason the trade request was declined.
The Robot Only Runs While the Terminal Runs
The second case is the assumption that a robot on a chart keeps working whatever happens to the computer. On a local setup it does not. An MQL5 expert advisor runs inside a running copy of MetaTrader 5. Close the terminal or switch the machine off, and the local robot stops receiving ticks and stops executing its logic.
If EMA 9 and EMA 21 cross during that time, the signal goes unprocessed until the terminal is running again. The same applies to managing a position that is already open, whenever that logic lives inside the robot.
For a robot meant to work around the clock, the answer is a Virtual Private Server. MetaTrader 5 includes a virtual hosting service that migrates the robot's trading environment onto remote infrastructure, and RoboForex offers a VPS for the same job. Once migrated, the robot keeps running whether or not your own computer is on.
A VPS solves continuity of the trading environment. It makes no strategy more reliable and fixes no error in the code.
Before moving to a live account
Check the whole workflow, not the strategy alone: free margin, automated trading permissions, the selected symbol, whether the robot is receiving quotes, and the Experts and Journal tabs. Running through that list separates a problem in the strategy from an ordinary launch error.
Conclusion
Building a first expert advisor on MQL5 covers the whole development cycle in one sitting: the trading logic, the compile, the test and the launch. The EMA 9 and EMA 21 crossover is deliberately plain, which is what makes the structure underneath it visible, and that structure is the same in robots far more complex than this one.
The next step is practical. Open MetaEditor, paste in the code, compile it, run it through the Strategy Tester, then put it on a demo account and watch how it behaves without any capital at stake. After that, the working system can be refined or replaced with your own, moved onto a cent account at RoboForex with the minimum lot, and connected to a VPS for round-the-clock operation.
Keep the focus on whether the robot does what the rules say, how stable the algorithm is and how the position sizing is controlled. That is the foundation the rest of an automated trading system is built on.
FAQ
Do I need programming skills to use this robot?
No. Copying the code into the file the MQL Wizard creates and following the compile steps is enough to run it. Programming becomes useful once you want to change how the robot decides to trade.
Why does the robot check for a new bar instead of trading on every tick?
The strategy is defined on closed candles. Without the new bar filter, the same crossover would be evaluated hundreds of times inside one candle, and the robot would act on values that are still changing.
Can I run it on any instrument and timeframe?
Yes, the code reads the symbol and timeframe of the chart it sits on. The worked example uses GBPUSD H1. Results differ by instrument, so test in the Strategy Tester before running it anywhere new. Fixed stop levels of 200 and 400 points also behave differently on instruments with a wide spread.
What is the difference between MetaEditor and MetaTrader 5?
MetaEditor is where the code is written and compiled. MetaTrader 5 is where the compiled robot runs on a live chart. They are two parts of the same installation, and F4 switches from one to the other.
The robot is on the chart and nothing happens. What should I check first?
Check that both Algo Trading permissions are on, then read the Experts and Journal tabs in the Toolbox. Most first-launch cases are reported there in plain words, with insufficient free margin the most common one.
Any information provided in articles on this website is based solely on the personal opinions of the authors. These articles should not be construed as trading recommendations or a call to action. The authors and RoboForex accept no responsibility for the results of any trades made on the basis of these recommendations and reviews. Past performance is not indicative of future results. Trading stocks and CFDs involves a high risk of capital loss.